- Details
- Written by: Webmaster
- Category: RCBot2 for DoD:S
- Hits: 3704


Edits to Mid-November 2023
Edits Feb - July 2025
This is not a "official" guide as I am not proficient enough yet to understand all waypointing tips.
However, I do know a fair amount to give you a starting position possibly better than the official guide.
As I learn more I will try and pick through the guides and note some issues with Day of Defeat:Source as the focus.
When I was starting I read the manual and noticed it uses a similar system to the older bot programs.
In your download of RCBot2 go to...
dod\addons\rcbot2\manual\ and click on "RCBot2 Waypointing Guide.htm" It will open in your default browser.
You can also view the same manual online from this address.
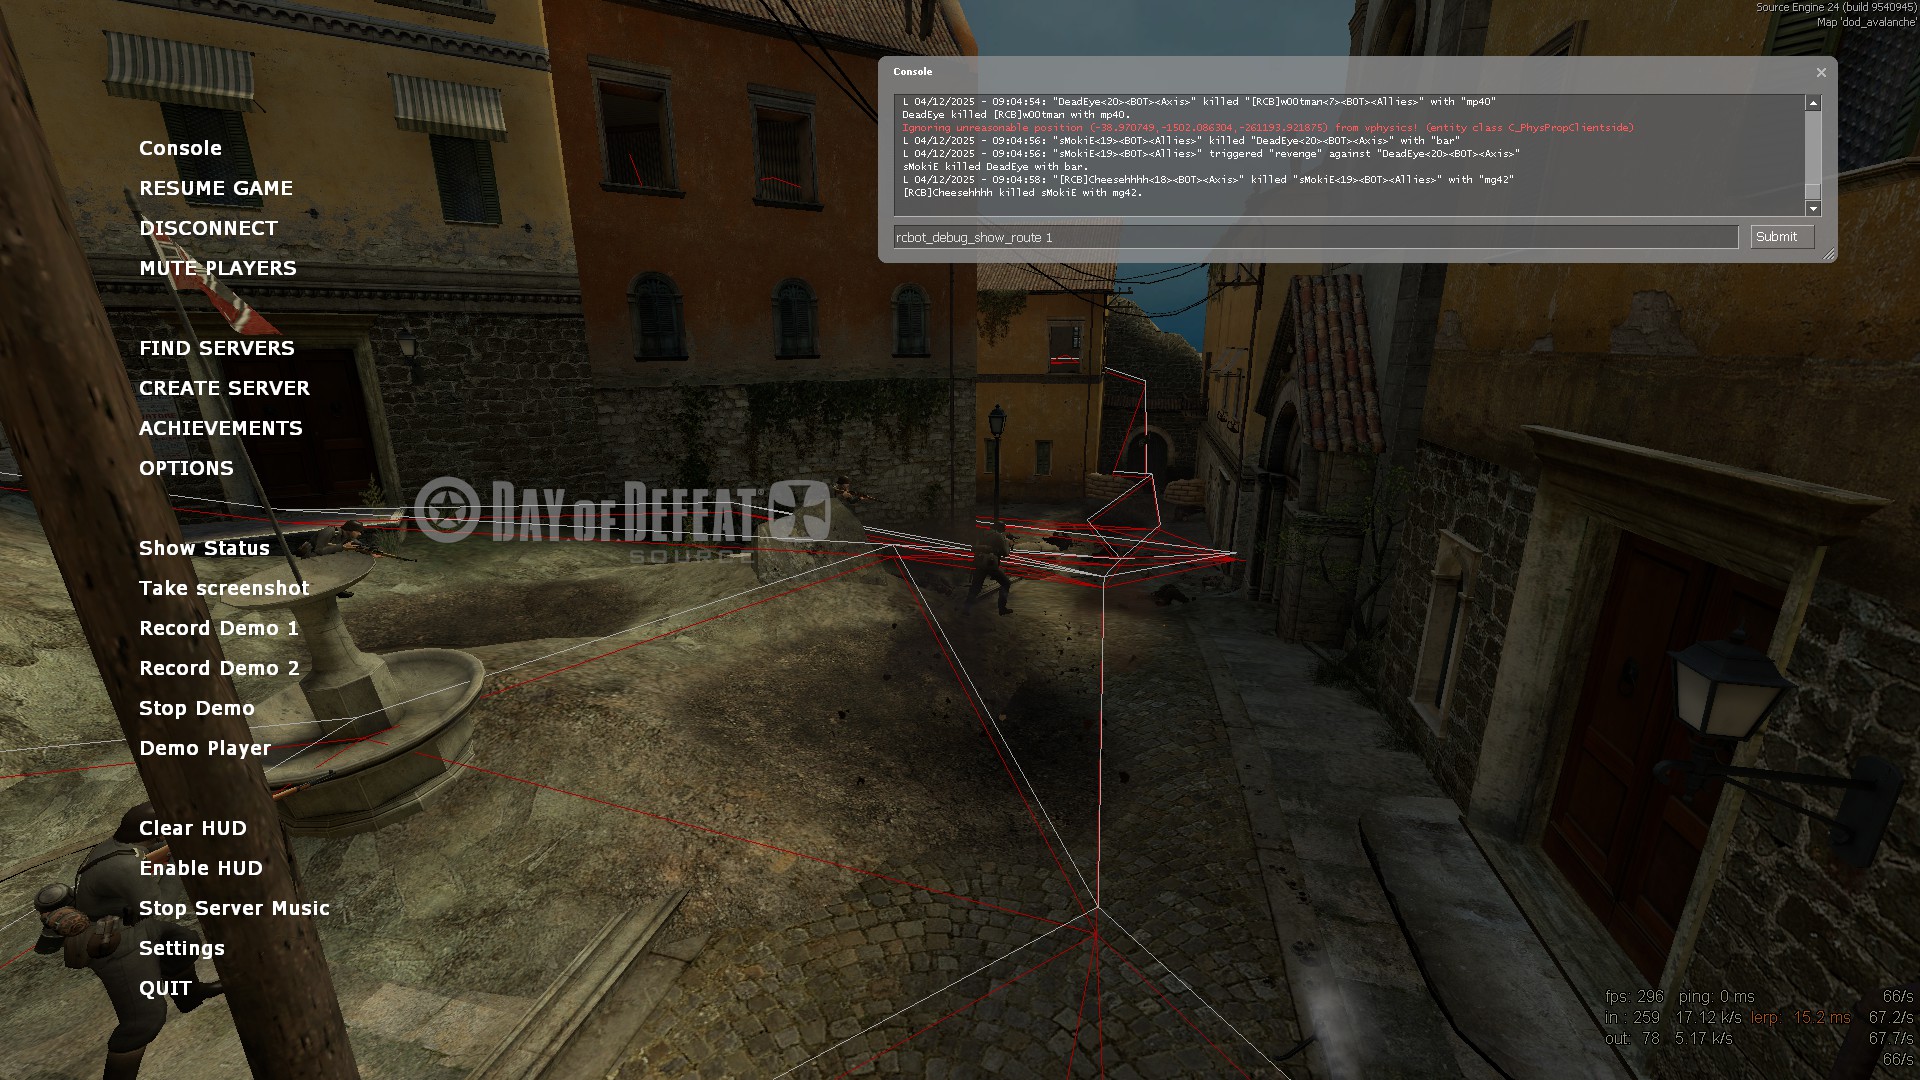
The method RCBot2 uses is placing down waypoints that look like "posts" colored Blue, then there are horizontal white lines that connect to the "posts".
The bot goes to the waypoint, in some cases, the waypoint has instructions (in the code) and is displayed in different colors in most cases so we humans can read the code too.
A green waypoint may tell the bot this is a good place for a sniper class bot to stand (see the middle image below) if you (and the bot) walk up to a waypoint it has details of what that waypoint is for.
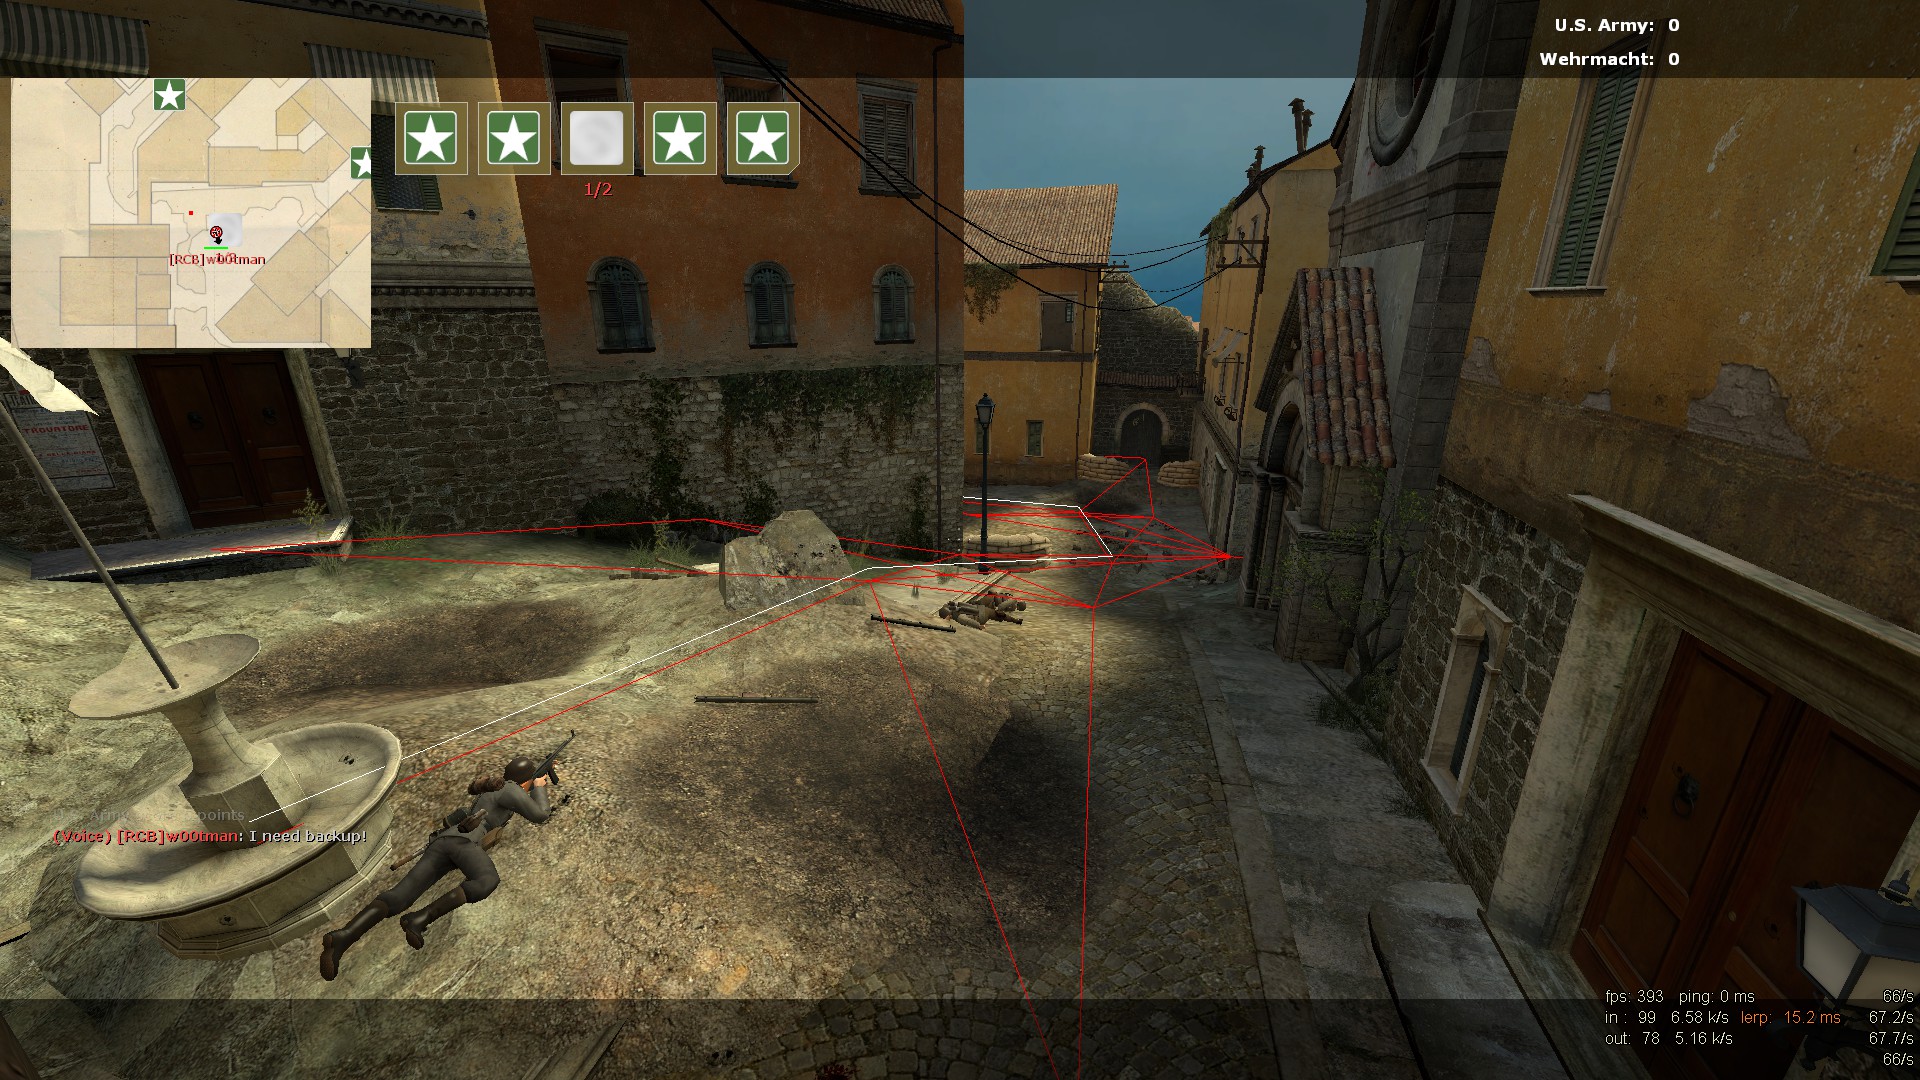
You can see those differences in the right image a large yellow box, it's a capture waypoint that was placed in a capture area and automatically changed from a standard "blue pole" to a small yellow box that you can adjust to define the capture area.
Further, (in the right image) you can read the text at the top of the waypoint, it has a waypoint number ID, the area, the radius and note the "tag" that says this is a "capture" waypoint.
 |
 |
 |
| Left: Waypoints dod_anzio bridge | Mid: Ladder waypoints (older RCBot2 style) | Right: Capture waypoint with text |
In the images above, the middle image is like the early version of the waypoint style, that older display looks a lot like the older GoldSource HL-1 waypoints for SturmBot or ShirkeBot.
The Left and Right images are the normal view for RCBot2, with very thin waypoints and paths and attached to the waypoints some text showing the properties of that waypoint.
That default view is handy and what you will use the most, the other view is handy in situations where map structure may hide the thin hard to see waypoints, in that case, we can issue a command to make them stand out more.
The command for the is "rcbot waypoint drawtype <type>" and has 3 views as covered here in the manual. The best views are type 1 and 2, those are select-able with more ease with a special keybind set I have below in the "Tools to help" section below.
Don't let the complexity overwhelm you, just keep reading.
The manual dives right into the commands and doesn't give you a good starting point!
That manual needs a preamble, it goes directly into many details on the more complex items you will use... later.
Most give up here, they go off to the RCBot2 waypoint forum and ask someone to make them, but often no one will.
Don't do that, it does have a leaning curve, and it is complex but in all leaning curves breaking it into smaller chunks and doing just one small map first is the first step.
Let's do a foundation of what this is at a very basic level.
Put the manual away for now and let's do the basics.
Boot camp day one.
Stop right there.
First up, how do you know if the RCBot2 download you have has the latest waypoints?
The method is to look through the RCBot2 forum (sometimes down) or the bots united discord and see if someone is working on one. The forum has topics and they are arranged in alphabetical order.
Next is my page on dodbits. Known RCBot2 waypoints and Map Downloads on that page I try and assemble all the official waypoints and add some that are not in the forum release posts. Also, there are gigabytes of map downloads to match the waypoints.
OK you googled it as well, you know there isn't a waypoint for your map.
Don't attempt your complex huge 5 flag map yet.
Do a small map first. A small Orange map with a simple layout.
YouTuber and Mapper JustBad has a video where he uses the commands in the manual to make waypoints for his map.
Just a note on his method, he uses a lot of the basic commands manually entering them into the developer console.
He turns on the command "rcbot waypoint autowaypoint 1" so the waypoints are automatically added and spaced where he walks.
He also has bots on the server when waypointing, which used to be frowned upon for this waypointing type.
I am not saying it is wrong but the bots do get in the way, I prefer to not have the bots running around and go to my config.ini and set zero bots.
There is an easier way in the next section using a special key bind set that eliminates most of that typing.
There are many methods to making waypoints, there are different levels too.
Some, like server owners just need the bots to get out of spawn and run around some basic routes. That's OK if there is a lot of humans but the bots will take flags or do special tasks in these simple sets.
The highest level is making the bots with only one human on the server. That requires a lot more reading, effort, testing and practice.
For now grab a Coffee and look at a couple of videos to get the feel of waypointing.
| Rcbot Waypointing for Day of Defeat Source by JustBad |
In that simple video, you can see him use the advice in the manual, you can see what 'waypointing" a map looks like.
I don't use that method for a basic set. It's okay to do and works for the level the author wants.
I turn bots off and I don't use the Auto waypointing command ("rcbot waypoint autowaypoint 1" for ON and "rcbot waypoint autowaypoint 0" for OFF) and prefer to place waypoints manually in the spawn first making sure the bots split up in groups if there are multiple exits.
But for his map, that's fine.
Notice the pathways to and from the waypoints are (in my opinion) messy, the waypoint in capture areas isn't on the flag.
It will work and the bots will be fine.
Note he does address items like the capture waypoints not lining up with flags, and it's certainly a method that is quick.
Around halfway in the video he starts to clean up problem areas. That's a good lesson, just lay down some paths and see what the bot's do, correct errors as you go.
It's up to you and the map you are doing.
The most important part of waypoint design is doing your quality control, lay down routes, go into Spectator, and let the bots show you what's wrong.
You will learn gradually as you solve each problem.
Search YouTube some more and you will find some more that are for TF2 and some are quite detailed.
[APG]RoboCop[CL] has a playlist on RCBot2, watch some of those here.
The bots are learning the map too. They have learning files that are written outside the waypoint file.
There is a steam guide that is for TF2 written by the bot developer Cheeseh. He explains the files / file system involved in this section.
The next section is a download to help with the most used waypoints and avoid most of the typing in the console.
The most complex part of this is knowing all the commands.
In the next section will simply that down to a printable page and some keybinds.
When I started waypointing I quickly learned to remember some commands... but it was too much for me.
I made my own KeyBind set based on the Key Pad and Navigation key area. 18 Keys in all.
This has binds to add to your userconig.cfg file, a readme and the image below you can print out (or place on your second screen) so you can see all the binds... my videos use these binds.
The speed of waypointing is worth doing this, I can very quickly make a set... in under a hour for most maps. I have seen others take days.
Here is a video guide on how the keyboard binds can assist you when waypointing.
| RCBot2 Waypointing - Tools that help |
Before you know it the actions become automatic (you quickly remember the keys, not the commands) and your "waypointing speed" will pick up.
The benefits far outweigh the installation and short learning curve time.
This will save you time !
You start a map, press "KP_SLASH" (/) and "KP_MULTIPLY" (*) and the waypoints are on and pathways are visible.
From there, the options are obvious in the image below.
The numeric keypad area is mostly used in this set of binds.
As above you can...
The navigation key area (left of the KeyPad area and above the arrow keys - see the bottom of the picture below)
These keys and binds help with special tasks, not often used but handy.
These help get you to places in the map you can't normally get to and adjust
They all have a chat message when pressed...
 |
| Key Pad binds for waypointing RCBot2 (Click to enlarge) |
You may already have an "userconfig.cfg" file in the dod\cfg or dod\custom\<some_folder_name>\cfg folder, in that case just copy the binds and scripts to your file.
Here are the contents of the file if you want to copy/paste into your "userconfig.cfg" file...
echo userconfig.cfg loaded with INsane's RCBot2 waypoint binds...

//RCBot 2 Keypad binds and functions
//MAIN
bind "KP_RIGHTARROW" "rcbot waypoint menu"  // Brings up the RCBot2 menu
bind "KP_ENTER" "rcbot waypoint save"  // Saves the waypoints to file
bind "KP_PLUS" "rcbot waypoint add"  //Creates a waypoint
bind "KP_MINUS" "rcbot waypoint delete"  //Deletes a waypoint

//Edit paths
bind "KP_HOME" "rcbot pathwaypoint create1"  // Remembers the waypoint you are standing at to create a path from.
bind "KP_PGUP" "rcbot pathwaypoint create2"  //Creates a path between the  waypoint when you use the create1 command and the waypoint you are now standing
bind "KP_END" "rcbot pathwaypoint remove1"  // Remembers the waypoint you are standing at to delete a path from.
bind "KP_PGDN" "rcbot pathwaypoint remove2"  // Deletes a path between the  waypoint when you use the remove1 command and the waypoint you are now standing
bind "KP_DEL" "rcbot pathwaypoint deleteto"  // Deletes all paths going TO the waypoint you are standing at
bind "KP_INS" "rcbot pathwaypoint deletefrom"  //Deletes all paths going FROM the waypoint you are standing at


//***************** Waypoints ON / OFF Toggle rcbot_waypoint_toggle
//ON = "rcbot waypoint on"
//OFF = "rcbot waypoint off"

alias waypoints_toggle "waypoints_toggle_on"
alias waypoints_toggle_on "rcbot waypoint on; alias waypoints_toggle waypoints_toggle_off"
alias waypoints_toggle_off "rcbot waypoint off; alias waypoints_toggle waypoints_toggle_on"

bind "KP_SLASH" "waypoints_toggle"  // Waypoints ON/OFF
//*****************


//***************** Pathway points ON / OFF Toggle rcbot_pathwaypoint_toggle
//ON = "rcbot waypoint on"
//OFF = "rcbot waypoint off"

alias pathwaypoints_toggle "pathwaypoints_toggle_on"
alias pathwaypoints_toggle_on "rcbot pathwaypoint on; alias pathwaypoints_toggle pathwaypoints_toggle_off"
alias pathwaypoints_toggle_off "rcbot pathwaypoint off; alias pathwaypoints_toggle pathwaypoints_toggle_on"

bind "KP_MULTIPLY" "pathwaypoints_toggle"  // Pathwaypoint ON/OFF
//*****************


//*****************Waypoints "draw type" Command - "rcbot waypoint drawtype"
// 0 (Type 1) = for effects engine (maximum limit of beams)
// 1 (Type 2) =  use debug engine (windows/client only)
// 2 (Type 3) = use debug engine (windows/client only) + show waypoint information

alias rcbot_waypoint_drawtype "style0"
alias style0 "rcbot waypoint drawtype 0; say Type 1 waypoints (Beam Type); alias rcbot_waypoint_drawtype style1"
alias style1 "rcbot waypoint drawtype 1; say Type 2 waypoints (Thin no Info'); alias rcbot_waypoint_drawtype style2"
alias style2 "rcbot waypoint drawtype 2; say Type 3 waypoints (Thin plus Flag Info'); alias rcbot_waypoint_drawtype style0"

bind "KP_5" "rcbot_waypoint_drawtype"
//*****************


//*****************Auto Waypointing Command - "rcbot waypoint autowaypoint"
// 0 = Autowaypointing Mode OFF, Debug OFF (no auto waypoints as you walk)
// 1 = Autowaypointing Mode ON, Debug OFF (lays down waypoints as you walk)
// 2 = Autowaypointing Mode ON, Debug ON (NOTE = not used in this Toggle just a simple on and off will do drop the Debug)

alias rcbot_autowaypoint "autowaypoint1"
alias autowaypoint1 "rcbot waypoint autowaypoint 1; say Auto Waypoints ON; alias rcbot_autowaypoint autowaypoint0"
alias autowaypoint0 "rcbot waypoint autowaypoint 0; say Auto Waypoints OFF; alias rcbot_autowaypoint autowaypoint1"

bind "KP_LEFTARROW" "rcbot_autowaypoint"
//*****************

//Server settings that help place wayoints

//***************** No clip on and off- "sv_cheats X; noclip; say noclip off/on"
// No clip is used to get to inaccessible places like inside a fountain to place a capture waypoint
// It requires sv_cheats to operate. The chat tells you the command status.

alias nocliptoggle "nocliptoggle1"
alias nocliptoggle1 "sv_cheats 1; noclip; say noclip on; alias nocliptoggle nocliptoggle0"
alias nocliptoggle0 "noclip; sv_cheats 0; say noclip off; alias nocliptoggle nocliptoggle1"

bind "PGUP" "nocliptoggle"
//*****************

//******************* Adjusting Waypoint Radius to 16 or 0
bind "KP_UPARROW" "rcbot waypoint setradius 16; say rcbot waypoint setradius 16"
bind "KP_DOWNARROW" "rcbot waypoint setradius 0; say rcbot waypoint setradius 0"

//*****************


//***************** Bots don't shoot the host ON / OFF Toggle rcbot_notarget_toggle
//ON = "rcbot_notarget 1"
//OFF = "rcbot_notarget 0"

alias rcbot_notarget_toggle "rcbot_notarget1"
alias rcbot_notarget1 "rcbot_notarget 1; say Bots don't shoot the host ON; alias rcbot_notarget_toggle rcbot_notarget0"
alias rcbot_notarget0 "rcbot_notarget 0; say Bots don't shoot the host OFF; alias rcbot_notarget_toggle rcbot_notarget1"

bind "END" "rcbot_notarget_toggle"
//*****************


//sv_gravity set a value of 200 and jump three times your height, press again and back to normal (800)
//The chat will notify you of the change, 800 is the default.

bind "PGDN" "toggle sv_gravity 200 800"
//*****************

//Frienly fire on /off (kill a bot teammate if they are in the way)
//The chat will notify you of the change.

BindToggle "HOME" "mp_friendlyfire"

//*****************
There isn't a lot of help for a guide that shows all the tips. The manual online misses a lot of things.
Here are some links that may help fill in the blanks...
Official guide - RCBot2 Waypointing Guide
TF2 guide on Steam - Waypointing RCBot 2 for TF2 By RCBCheeseh (is mostly still OK for DoD:S)
About the "Route waypoint addition" - from the RCBot forums
Basic Waypoint Guide (2009) - by Cheeseh RCBot2 forums
Tip for adding waypoints to places you can't normally get to. Use "noclip" on a listen server.
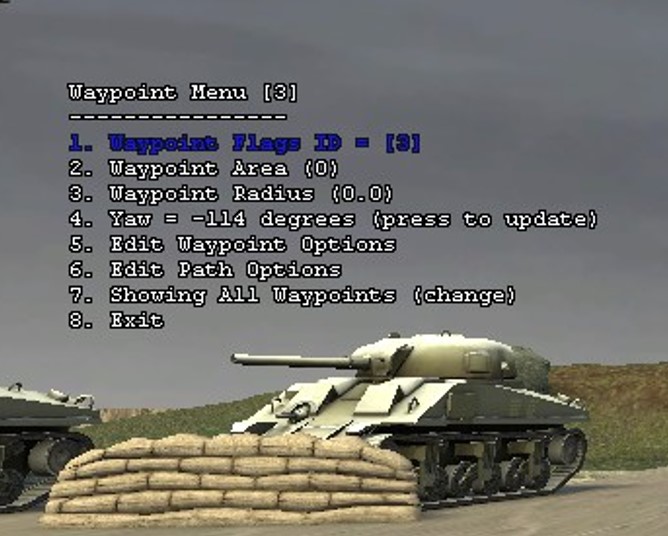
Waypoint Menu Walkthrough - This is an in-game menu with many options.
Use the command "rcbot waypoint menu" to start. It's only covered briefly in a post here.
This needs a lot more information about what's in that menu.
It's a lot! I'll cover that separately below.
This menu was added way back in 2013 and not much is documented about the menu. So...what is it?
Like my (and others) Key binds it helps when accessing the 38 commands in the RCBot2 waypointing system.
To get the menu to display you use the command "rcbot waypoint menu" ("KP_RIGHTARROW" - keypad 6 in my key binds)
Pressing (1) - Waypoint flags
 |
| The waypoint menu main screen |
It works similarly to the SourceMod Admin menu.
A menu where once on the screen you use your number keys to navigate to categories that use number keys to move to another "page" or enable a feature to be added to waypoints.
Let's say you wanted to add a "sniper" tag to a waypoint...
 |
 |
 |
 |
| Step 1 | Step 2 | Step 3 and 4 | Step 5 |
The Waypoint Flags ID section of the Waypoint menu has many pages. Explore them and look at the manual for what those tags can do.
There are so many tags in that section to cover, refer to the manual and look up each one.
Some are obvious, some are not clear and you may be missing out on an essential feature.
Let's look at one "Routes".
You can find it as the second selection of the first screen, "route". That function reminds me of the function in SturmBot called "Ways".
It is like a "main road" in a suburban road system.
It's an important route to connect the paths to goals like the flags to capture or make a safe route around a dangerous area.
Here is one example in the manual. Cheeseh does go further in his TF2 steam guide. To find that go to "waypoint types" and find "Route".
There is an RCBot2 forum post on that here that will help explain how to use that waypoint type.
The other Waypoint Menu sections.
Pressing (2) "Waypoint Area"
Lets you set the Area ID of a waypoint that is related to another capture/flag waypoint, like a "defend" tag on a waypoint near a flag. It lets the bots know what "Area ID" (what capture/flag) they are defending, read about that here in the manual.
This one, when I was starting confused me with the setting below "radius".
It's because my brain triggers "measurements" if the word "area" is mentioned.
It's not a measurement, it's an identification of a place, an ID of a map entity.
Let's take a brief time to explore how the capture areas and flags work in a map.
When a mapper places a "flag" in DoD:S that is called a "dod_control_point" it's a point entity (basically an item in the map that is sometimes seen as a model but has functions other than just a seen model).
The first flag has a unique ID of "0" under the "Index of this point" setting.
Other flag and capture "points" have a unique ID of 1, 2, 3 and so on.
See that ID setting in the image below - the lower left of the image.
It has a flag model where you can set what team owns it, sounds if captures, points it delivers...all sorts of options.
That "dod_control_point" entity has a trigger around it called "dod_capture_area" it's a cube-shaped brush entity (basically a trigger if a player model touches it) that the mapper defines as the capture zone.
See how the "dod_capture_area" links to the "dod_control_point" in the lower right of the image below.
It all ends in the "dod_control_point" entities reporting back to a central entity (unseen in a map) called the "dod_control_point_master" that takes inputs from all of the control points.
If one team has captured them all... that master will trigger a round win.
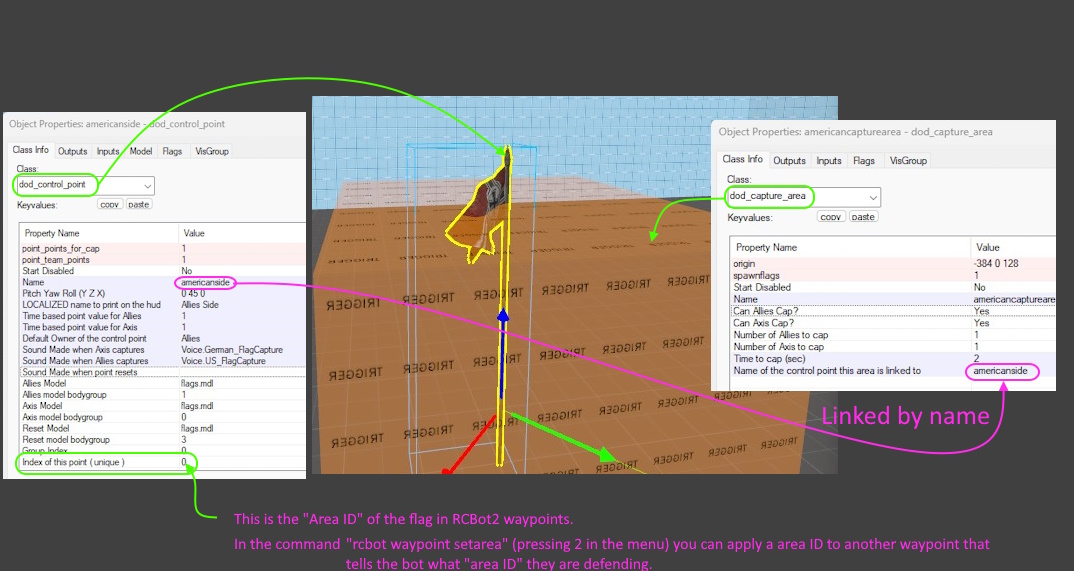 |
| Click to enlarge the image - dod flag and capture entities |
The function will not be used much in dod:s, it will happen automatically mostly when you place a waypoint inside a capture area or a flag. The waypoint system will do that for you.
So what does that look like on a waypoint?
See the image below from the map "3xi_renega2" where each waypoint on a flag has...
 |
So remember when looking at a capture area that the "Waypoint area" is a location, it's to identify and be used on other waypoints.
The "Waypoint Radius" is how big that capture area is, for dod capture zones you don't need to edit it, it's for other waypoints.
That's next, how to adjust the waypoint radius and where you would use it.
Pressing (3) "Waypoint Radius"
This isn't covered as a separate topic in the manual but is important for capture areas and some tight areas... read the Capture section.
So considering the topic above, where would you use that? There are some usage examples in the TF2 rcbot2 waypointing steam guide.
In my waypoint binds, Pressing Keypad 6, then "3" will get you that submenu, then press "1" to increase and "2" to decrease the radius. Also I have some preset sizes in that bind set, Keypad 2 will reduce the radius to "0" and Keypad 8 will get you a size of "16".
You can see the use for DoD:S in the below video. It is (mostly) used for tight areas where the bots may come together and collide.
Note in this old video how nearly every waypoint has a larger radius. You don't have to place that on every waypoint.
I found the bots seem to navigate around each other OK as DoD:S player models don't collide like player models in other games.
Here is my personal preference and explaination:
I see a lot of waypoint sets do use it more than I prefer. I find using it a lot is an unnecessary step for DoD:S maps.
I base my waypoints on how they test, I use the radius adjustment rarely but it does come in handy sometimes.
So my advice is you do the same, test and base your edits on your observations from your own testing.
However, take note of the use on the TNT supply on the bridge area, it's used on them too. The manual goes further into detail on that waypoint tag here.
So when making your own set, you make up your mind, and don't forget DoD:S player models don't have the same collision issues you find in other games.
| RCBot2 DOD:S 0.7 dod_colmar waypoints |
To adjust the radius, just stand on a waypoint and...
Pressing (4) "Yaw = (waypoint details) "
Manual entry is here. This is adjusting where the waypoint is facing, (the horizontal line off the "post") where the bot will "look" for targets.
In image 5 above if I wanted to spin that 90 deg, I would stand on the waypoint, look to the new target, and press "4". The "yaw" now adjusts to the new angle.
Pressing (5) "Edit Waypoint Options".
This one is interesting. The image below explains it. Cut, copy and paste a waypoint.
I guess if you have a waypoint with a lot of settings (tags, area and radius) you could save time by using this menu feature.
I don't use it often, but that's what this is.
The best use is in spawns:
Typically you should make a waypoint, then apply a radius so lots of bots can move into it quickly, then apply waypoint flag to limit the opposite side from using it, then place a sprint waypoint flag so bots get moving out of spawn quickly and as they do so have more room to move around the waypoint.
That's a lot of edits and you may have to place 10 like that in every spawn, so after you build one just copy it, go to another spot and paste it.
That is a massive time saver and spawns are done in no time.
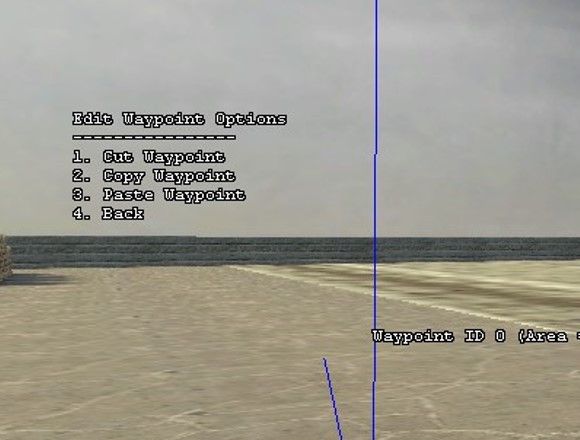 |
| Edit Waypoint Options |
Pressing 6 "Edit Path Options".
This a selection of two commands, stand near a waypoint and you can delete the paths to or from it, or both.
It is covered in the manual here in the manual here in the manual here.
You can do this with more ease using my key binds, the Key Pad 0 (INS) key will delete all paths from the waypoint and the Key Pad key "." (DEL) will delete all paths to the waypoint you stand on.
That is handy via the menu and an example of how it saves time, much better than typing those long commands in the developer console.
Pressing 7 "Showing all waypoints"
Be careful with this.
It is supposed to hide waypoints as you select one type to find amongst all the other types... the trouble is undoing that and getting your view back to look at all your waypoints.
It is easy in the end, here is the process.
Let's say you have a busy area and you know there is a waypoint with a sniper tag for axis (dark red) and its in the middle of a bush.
Something related to finding waypoints that aren't in the menu is finding a particular waypoint.
In the developer console the command "rcbot waypoint show" (manual link) "rcbot waypoint show <waypoint id>" can be used and a horizontal beam will come from you to the waypoint.
For me, it is only on for 4 seconds.
This command will save you a lot of time on some maps.
Looking at one example is dod_argentan. Waypoints have been made and updated in 2023.
There is a "remake" dod_argentan_fix by Everett "emc" McLeod.
It's the same map, the fixes are mostly cosmetic (but important) for matchplay and eliminate some issues.
The bots use the same route as in dod_argentan.
The process of making waypoints is simple.
Important: The next part is saving the file correctly, read that carefully as there are some issues.
In my case for the tutorial map I didn't save the waypoints, the waypoints autosaved after you entered the command.
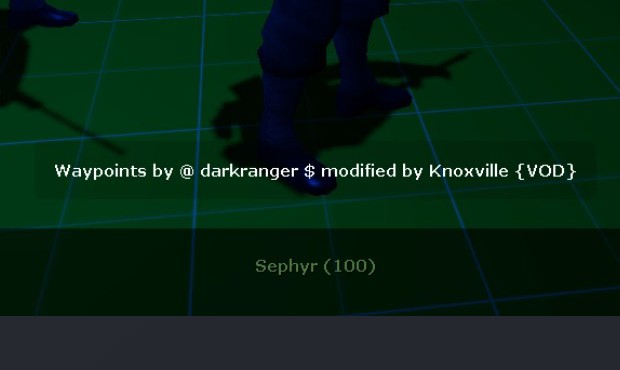
You could also use "rcbot waypoint save" and that can input the orginal mapper's name and yours resulting in the "Waypoints by" message giving this output...
"Waypoints by person1 modified by person2"
This does not work if the waypoints are old or have no name come up in the "Waypoints by" message.
If you know the waypointers name you can enter the names manually after "rcbot waypoint save"
However, if you have special characters or spaces in either name they will not display correctly.
Use this format, place BOTH names in quotes.
rcbot waypoint save "First @special@ Person" "Second Person {clan}"
Like this example...
The orginal mapper called @ darkranger $ has spaces and special charcters in his name.
However, seeing the waypoints were old, his name didn't get recorded.
Knoxville {VOD} modified the map and saved the map... his name is the only one on the waypoints now.
The solution...
Knoxville {VOD} knows the mappers name. If not... well you could use "unknown".
The correct format to fix that is...
rcbot waypoint save "@ darkranger $" "Knoxville {VOD}"
The "Waypoints by..." screen will now display...
 |
Thats it. Waypoints done.
| A video to recap the steps and process of the "rcbot waypoint load" command. |
Note that in this process I didn't save the waypoints, that was planned in this case!
That's because I didn't want to take away the credit/s of the person/s who did the waypoints.
I made that mistake recently... because I thought you had to save the file after entering the command, you don't.
What that did was keep "genmac" (the original waypointer) but knocked out "[APG]RoboCop[CL]" who had just updated the waypoints in 2023.
Now, without saving, when the map loads they will say "[RCBot2] Waypoints by genmac modified by [APG]RoboCop[CL]"
The credits are written in the <mapname>.rcw file.
Just be mindful of that, but if you do have to change some items, do save them!
Waypoint files are stored in the folder address - dod\addons\rcbot2\waypoints\dod
There are four types. Cheeseh explains in this post what they are, and what they do.
.rcw
"The main file type is <mapname>.rcw, this is the actual waypoint and is all you need to share waypoints."
.rcv
"This is generated by the bot, it generates a visibility table so bots know which waypoints are visible from other waypoints, this is useful to find cover positions."
.rcd
"This is generated by the bot, and gets quite big, about 4MB, each, this is used to generate the distances between paths so bots know what paths are shorter than others."
.rcb
"rcb is just an array of stored memory for the bot. It keeps a record of how much danger is at each waypoint for each team. When a bot is added it will read this data for its team, when a bot leaves it will save the data by averaging its data in the file."
The takeaway point here is that the <mapname>.rcw is the main file. The others store information that is constantly replaced.
When waypointing other bot systems it is advisable to delete the "learning files" as you change the waypoints.
I am not sure if this is required for RCBot2.
But as a normal step as I am doing a final review I always delete the other files and leave the <mapname>.rcw file.
That's up to you but seeing the <mapname>.rcw is only file the next person will get, it's likely a good step to do.
In the video below this picks up on the previous video to complete a map.
Again I am using my waypoint binds, these speed up the assembly of a waypoint set, so more about how yu can use them.
Also covered is the importance of looking at your waypoints and making a quality check, play-test them and observing the bots is critical as they often show you issues.
We also should look at waypoints made by others, in the video we explore waypoints for dod_anzio and dod_kalt, they got some updates in May 2023 from [APG]RoboCop[CL] has a playlist on RCBot2, watch some of those here.
Here is the video...
| rcbot2 waypoints - advanced tools and tips |
I did some tests on ladder waypoint sets and they are not an easy item to fault find and fix.
RCBot2 does not handle ladders well in some circumstances, it depends on the way the mapper has them constructed.
This is a problem with most bot systems I have waypointed for.
Two different layouts are common in maps, forward facing exits and ones requiring a 90 degree turn at the ladder top.
The ones with a harder 90 degree turn are also often found on multiple floor buildings as below.
 |
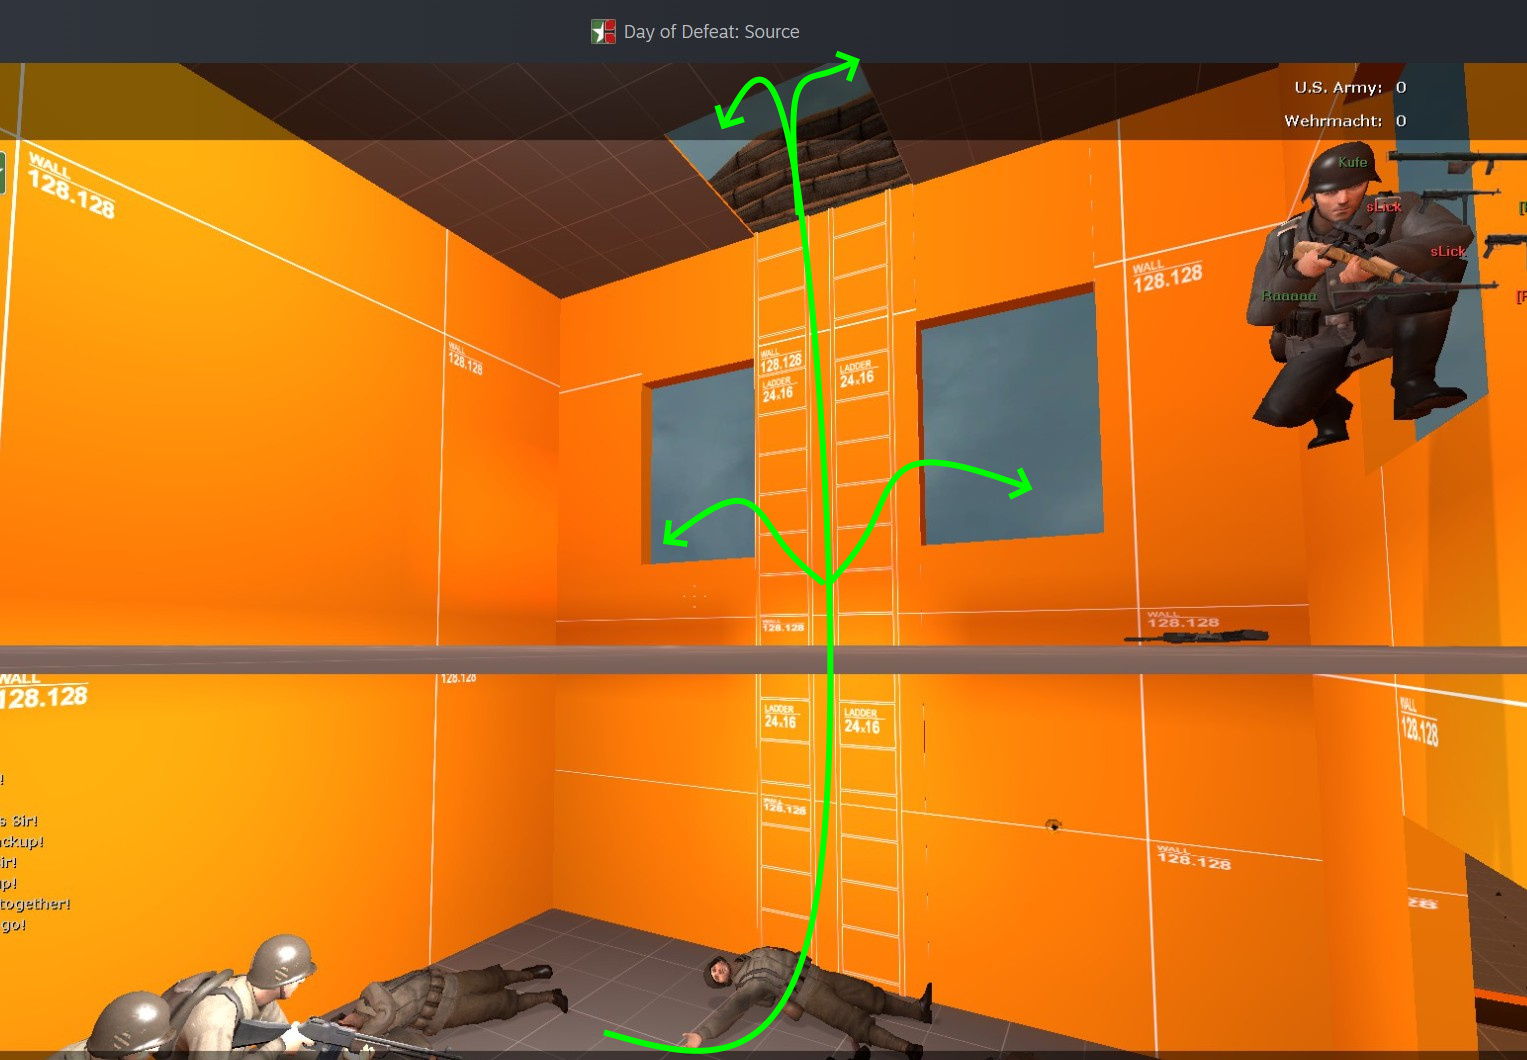 |
| Easy - Forward facing exits (3xi_indoor_arena map) | Hard - 90 degree turn exits (arena_mayhem map) |
The best ladder layout to do is a one where the bot enters the bottom ladder facing the ladder and the exit point is also a forward facing exit.
The "Easy forward facing exit" types as covered here in the manual will work as described, the bots sometimes turn if an enemy forces them to turn before they exit the top but on the whole the ladder tag at the bottom and a normal waypoint at the top will be OK.
In all ladders, make sure the wayoint before the ladder waypoint is dead on straight to the ladder...and the ladder waypoint points to the ladder and the waypoint is in the middle of the ladder.
This keeps the bot on course.
The ones that require 90 degree turns to exit require a lot more effort. They too have the same issue if the bots see an enemy and turn halfway up.
The ladder itself can also be an issue if they don't start at floor level.
It is typical to see the bots enter the bottom ladder and look up, this helps the bot see the top waypoint.
Sometimes they will will be upright and go up the ladder no problem
However, they may crouch, try to go up and bounce off the ladder. That indicates a problem further up, the bot may sit there looking at the route trying again and again and bouncing off.
You may also see the bot go up and then go down again as the only valid waypoint they can "see" is going down.
These issues (and more) happened on a set for the dod:s "arena_mayhem" map you see in the image above.
The two buildings on arena_mayhem are in the center of the map. Each has two floors and a single ladder for both floors.
The issues are...
Exit waypoints for first and top floors:
 |
 |
| The first floor exit - Ladder (yellow) waypoint and two off to the left and right | Top ladder exit waypoint |
Now you have the exit with left and right (in case the bots turn) you can lay out the floor waypoints. As before it is better to delete all paths and do them manually in a tight spot like this.
You may want to try and put sniper and machine gun waypoints on the floor looking out the windows.
Just be sure you also place some normal waypoints looking out the windows or off the top. Other bot classes bots will want to use that building too.
It's one of the faults I found, if you just cater for snipers along that ladder building floor route, the bots go up the ladder don't see any sence in going further and come back down. Often creating a jam with other bots. Consider a set of plain waypoints looking out so all classes can visit those spots.
Its the same for team only tags on the sniper and machine gun waypoints, normally you could do that but seeing this is a route used by both teams, consider not making ANY team specific waypoint tags for this route.
Failure to do those last two points... you will see the bots at the bottom of the ladder, often crouched attempting to jump and getting bounced off. It means they can't figure out the route I would say. They can't "see" a waypoint they can use.
Test your waypoints and try different layouts, the advice I have for you above could work in a lot of places but the lesson here is ... experiment, observe the bot, they often say "Negative" when in those "I'm stuck...can't work this out" situations.
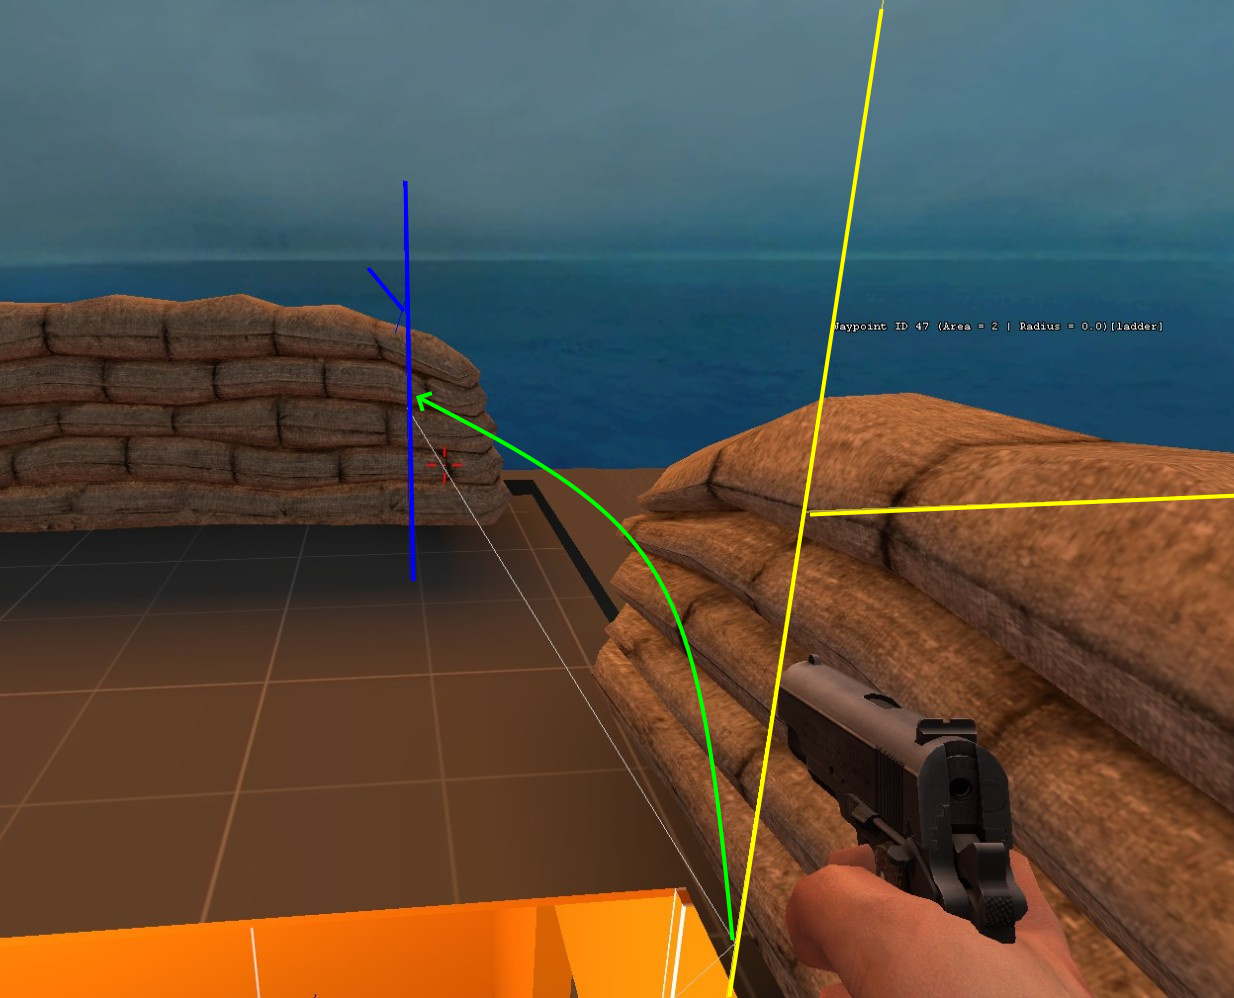
Some ladders are really hard. dod_obacht was a problem ladder and it had a flag on the floor... you have to make that ladder work.
But if cap zones with more than one player required are involved then you need to get a bot up there with you.
I found the bots are extra keen if a flag is involved after the ladder and there is no other route possible to cap out.
One last tip is look at the flag, read what "Area" it is, (look at the image above " Top ladder exit waypoint") make all your ladder and other special sniper waypoints that area number, in this case the middle flag was Area 2 and just outside the building.
Read about "waypoint set area" on a waypoint here. All it is to apply to a waypoint is the waypoint menu select "2" Waypoint area (0) and press your 1 key to increase the area number to match the area you are in.
It might make a big difference if the cap zone is on the ladder route.
If a ladder is really hard there is nothing wrong with leaving that area and let the "human team" have that area.
Somethings in a bot waypoint set may not be worth your valuable time for a bot that may visit the waypoint...every second hour.
Looking at the map itself in hammer with problem ladders.
I recently brushed up on my mapping skills, I started to finish off a map I made in 2009.
Now I used to make ladders (func_ladder a brush entity in Hammer) to be at least 1 unit off the model and the floor so its not touching anything.
I added RCBot2 bots and the ladders I made although OK for me... were murder for the bots.
In the map (remake of dod_schwetz from dod 1.3) there are many long ladders required even some that come off water.
I soon found that RCBot2 bots needed help. I re-configured the ladders and now they are no problem.
There are some rules mappers should look at when making ladders.
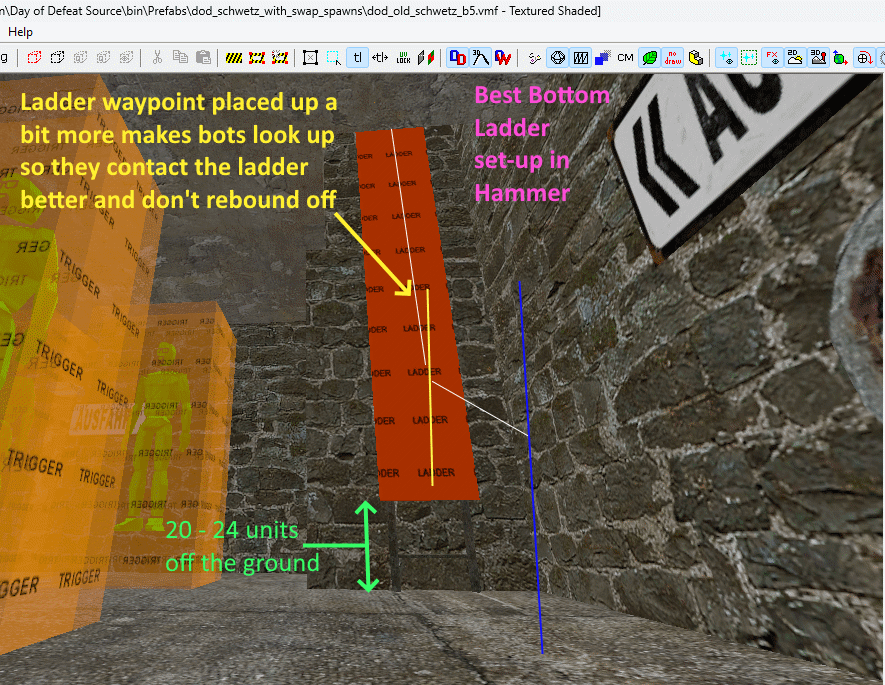 |
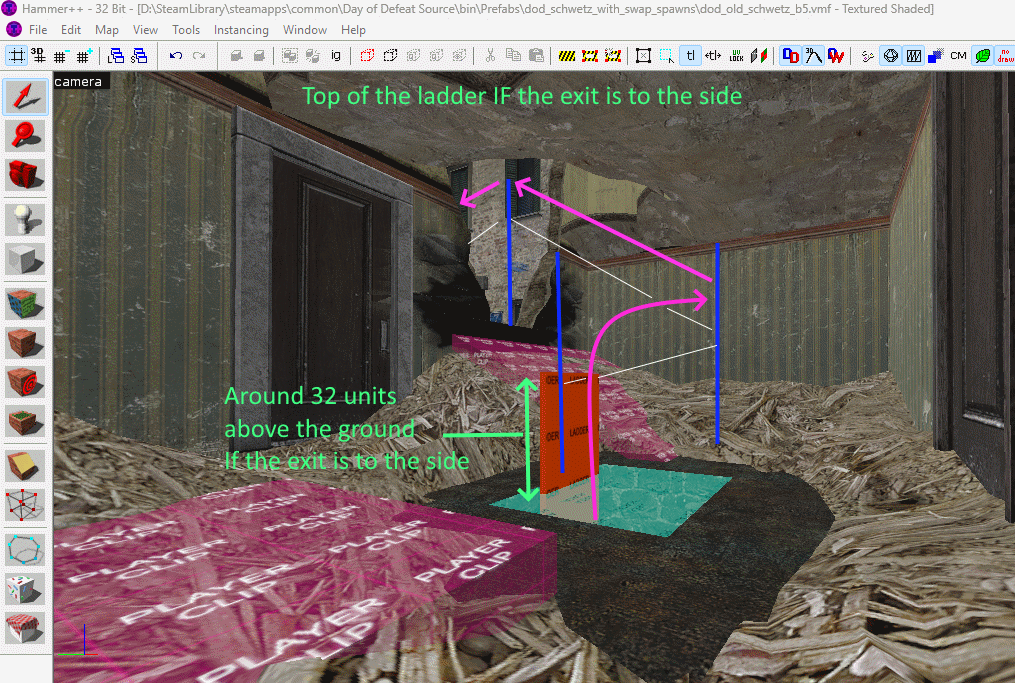 |
| Best bottom ladder set up. | A side facing exit on the top of the ladder |
The Bottom of the ladder issues for the bots went away after I took the func_ladder up around 20 units, then also did the same for the waypoints.
I think it makes the bots "look up" more and when you try that in the game you will note looking up on a ladder can give a smoother entry and exit... the rope ladder in dod_anzio on the old dod 1.3 teaches you that.
The Top of the ladder side exit issue if configured correctly in Hammer works flawlessly. Just let it stick above the ladder exit 30-50 units and it stops bots getting stuck.
Some maps that are made already, even top maps like dod_anzio have bad ladders. They can be improved and I am very tempted to de-compile a map with issues (there are a lot of them) and edit the map, save it, compile it, pack it up and rename it with "_fix" on the end.
I have spend hours on a map with bad ladders... it is actually quicker to fix the map then trying to get rcbots to work with badly configured ladders.
This command is normally rcbot_debug_show_route "0" (disabled).
You will not see anything until you spawn a bot and they start using the waypoints.
So to experience this for the first time...
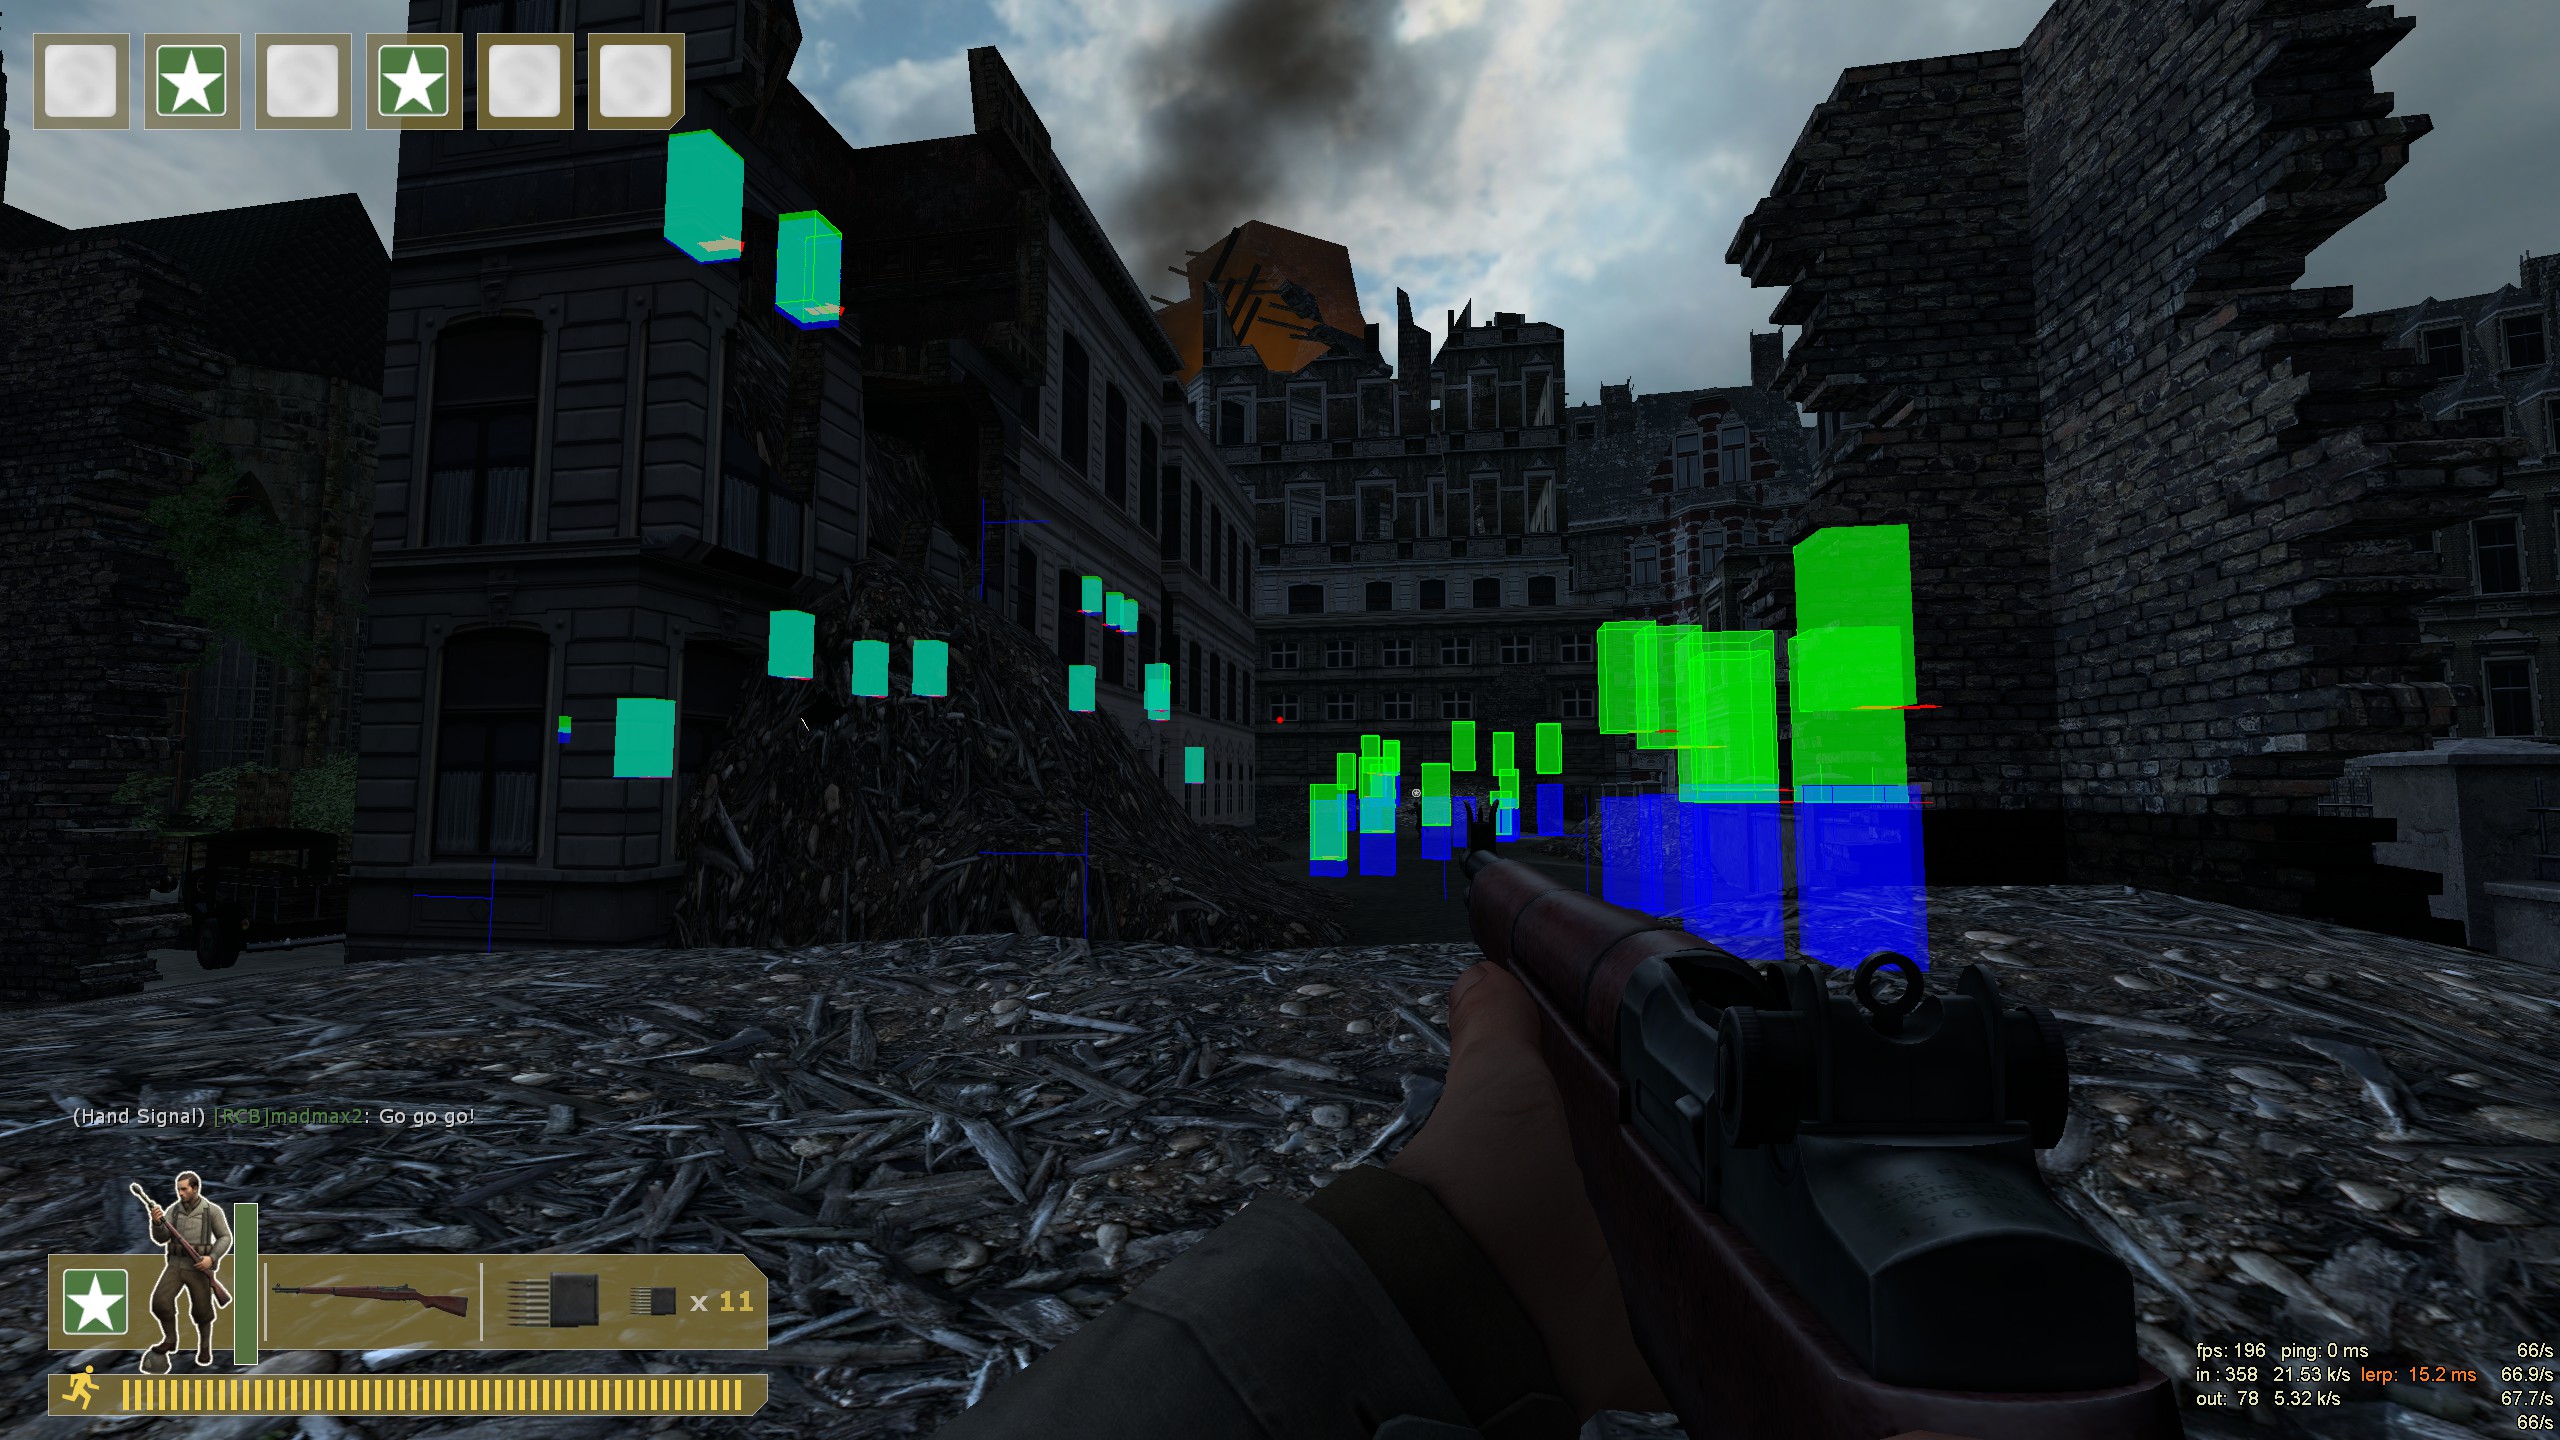
If there are a lot of bots on the server it gets quite hectic.
 |
 |
| Routes with a lot of bots on the server. | Routes with two bots on the server. |
Making sure you have all the spawn points identified and waypointed is important as you may end up with bots that don't move.
In most maps the spawn area is simple, around 16-18 per side and all grouped up like the beach in dod_anzio for allied team and the building near the axis first for axis.
You can start a 32 player listen server with RCBot2 set at 31 players (plus yourself) , bring up the minimap (overview panel) and see where the bots are, make sure a spawn point has a waypoint close by.
Then you can increase the radius (see here) of the waypoints, make them a team specific type and it is always good to add a sprint flag on these so they burst out of spawn.
Then there are maps like dod_frankfurt_b@dbeta6 that has very complex spawn points all over the place and hard to find.
In that case we can use a command that shows the spawn points for 60 seconds, "map_showspawnpoints"
To use this you must have sv_cheats "1" and then use the command "map_showspawnpoints".
You have 60 seconds to find them and it will look like this...
 |
| dod_frankfurt_b@dbeta6 - Allied spawn |
There are many spawns up high and inside buildings that are very easy to miss.
On maps like this map_showspawnpoints can really save you a lot of time.
If you have played the many dods RCBot2 custom maps that are the orange (developer style) you may have noticed most of them (made by Darkranger in the past) the bots cannot cap flags. The waypointer didn't include them for a reason, Gun Game maps don't need them.
But, that is bad for a normal game mode in day of defeat source and maps are being altered in 2025 to have flag captures as a standard mode.
The Problem:
Darkranger made made most of these "wrong" (unplayable) waypoints for the SourceMod dods Gun Game plugin, the problem is that if capture zone waypoints are added and the Gun Game plugin is active, bots will hang around capture points and ask others to join them.
Darkranger didn't put in waypoints to capture flags and capture zones as those stop the fast paced flow of gun game.
The plugin turns off the dods capture function but the bots don't know that, the result is... bots don't move around the map targeting other bots.
The Solutions:
Solution 1: You can of course edit the waypoints for your own use and remove the capture waypoints.
Solution 2 (best): RCBot2 has a dod:s command called "rcbot_dontcapture" the default is "0" (OFF) Turning that to "1" (ON) the bots will now ignore the capture zones and race around the map scoring hits like they are supposed to be doing in a Gun Game match.
You can place that in a <mapname>.cfg file so when that map runs gun game will start, and the command "rcbot_dontcapture" is set to "1".
Then in your dod\addons\rcbot2\config\config.ini file make sure you have rcbot_dontcapture "0" to set that back to the default.
In my dedicated server and my Listenservers for Windows or Linux, I run this this plugin, Extended Map configs.
This allows me to ensure all the commands are set for a normal map (using the file "all.cfg") an also when a map is selected the special map config is the last to load, the final say in server settings. That's important as the RCBot2 MetaMod:Source plugin has a habit of wanting to be last to load... it cannot with Extended Map configs.
Here is what my config file looks like for dod_gg_sprengen_s4e.
Noting I have rcbot_dontcapture "0" set in the dod\addons\rcbot2\config\config.ini file to set it to capture flags in normal maps.
You can see how I use the command rcbot_dontcapture when the gun game map is about to load...
// Configfile for: dod_gg_sprengen_s4e

//Bots don't capture flags in DOD:S
rcbot_dontcapture 1

// Server time (in minutes)
//mp_timelimit 25

// In case DoDs Equipment 0.0.7 plugin is on, we need it off for GG maps
sm_equip_enabled 0

//Gun Game
//Start the server with gun game off or on Enable/disable DoD:S Gun Game. (0 = off 1 = on default 1)
sm_gungame_enabled 1

//Enable/disable flags in DoD:S Gun Game. (0/1, default 0)
sm_gungame_flags 0

//Enable/disable Handicap mode in DoD:S Gun Game. (0/1, default 1)
sm_gungame_handicap 1

//Enable/disable spades in DoD:S Gun Game. (0/1, default 1) Has to be enabled for Spade Pro mode (below) to work.
sm_gungame_spades 1

//Enable/disable Spade Pro mode in DoD:S Gun Game. (0/1, default 1)
sm_gungame_spadepro 1

//Enable/disable Turbo mode in DoD:S Gun Game. (0/1, default 1)
sm_gungame_turbo 1
//end Gun Game settings
Its a little more work but makes the gun game run smother and there is no need to edit countless waypoints.
In the official waypoints, capture waypoints will be enabled... unless the map name specifically has "gg" in it... like dod_gg_sprengen_s4e.
This issue of a very large radius applied when crouched and making a waypoint is annoying and easy to miss.
You don't see it right away but for some reason in some places it can be as large as half the map.
Here is a typical one...
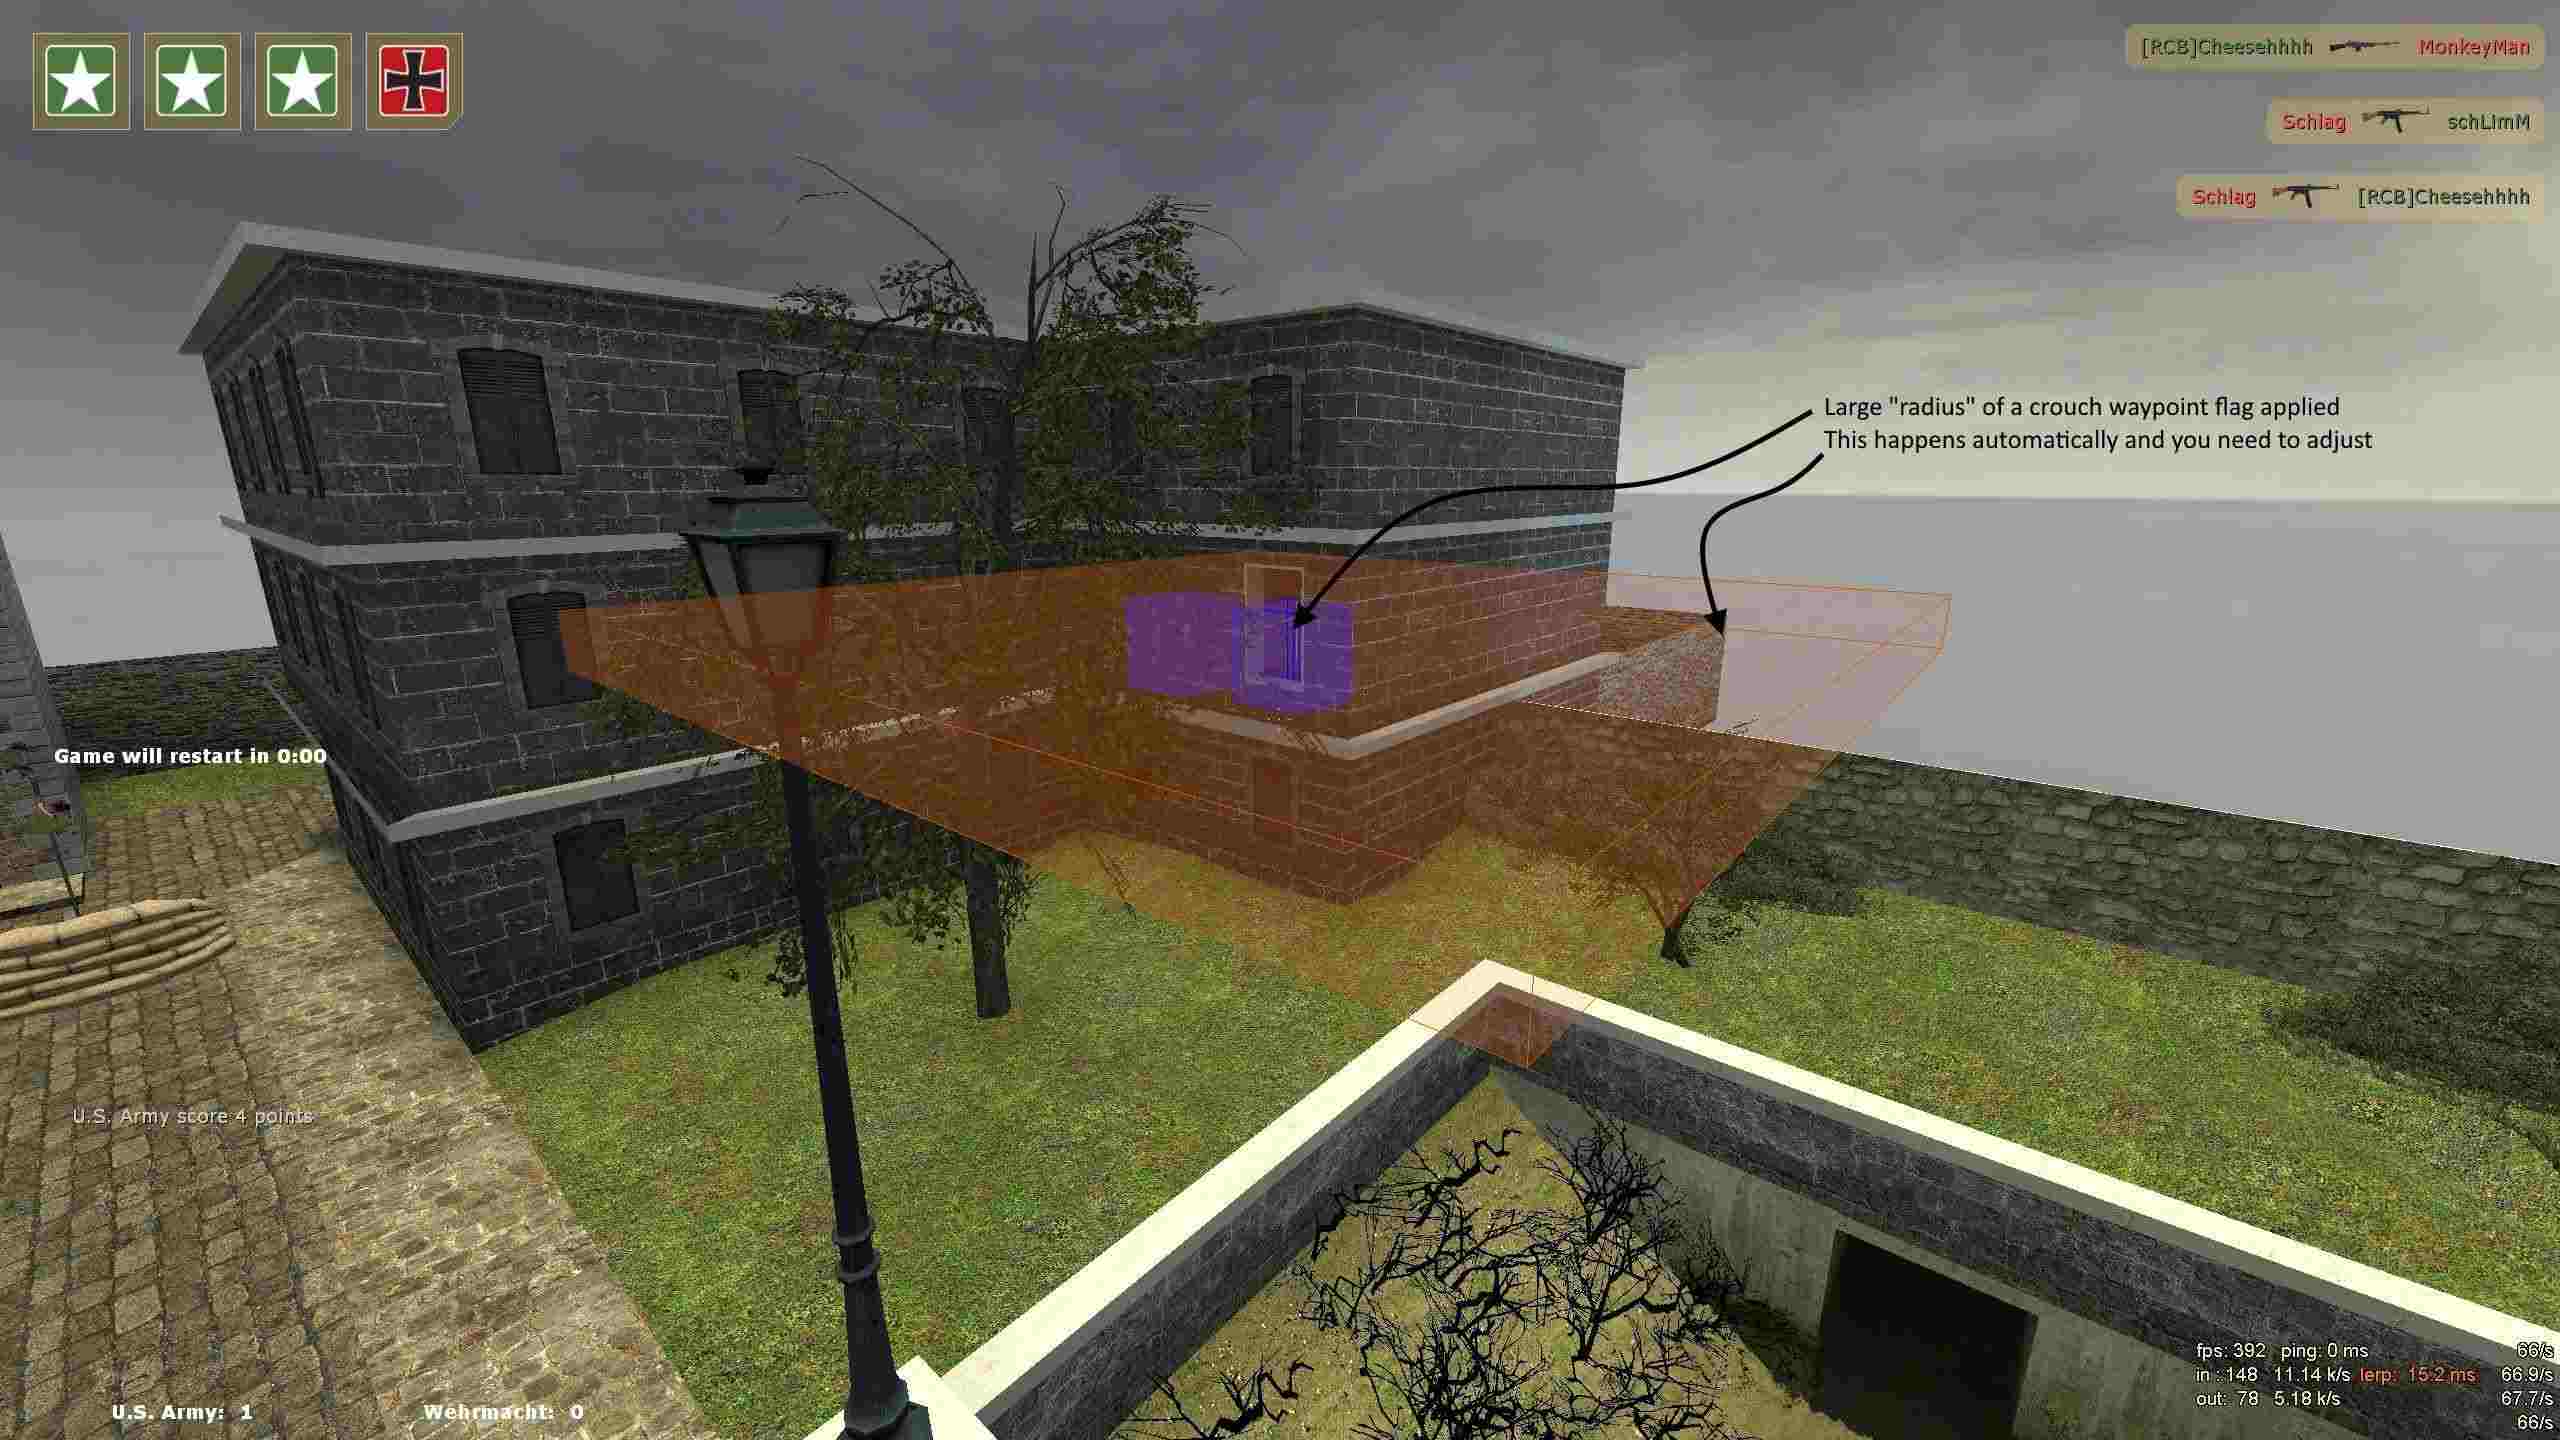 |
| 415vire_b6 - a Crouch waypoint was applied and it automatically added this huge radius around the waypoint |
As you do any crouch waypoints know that this can happen.
The Main waypoint menu (command "rcbot waypoint menu" ("KP_RIGHTARROW" - keypad 6 in my key binds) you can select option 3 (numeral 3 on your keyboard) and then press 2 to decrease it.
This is the command "rcbot waypoint setradius" using that command you can set a value, if you want no radius then use rcbot waypoint setradius 0
Alternatively, if you use my key binds I have 2 common sizes - "16" ( KP_UPARROW 8) and "0" (KP_DOWNARROW 2)
It is an annoying bug but using my menu and pressing those sizes helps deal with them quickly.
Eventually you will come across maps that have capture zones and flags set in "stupid" places for the bots.
Humans can easily find these capture areas in dods as when in a capture zone the objective icons expand and you get a capture panel notice in the HUD.
But the bots need that information in a waypoint, a "capture" waypoint flag and also the area it belongs to and then also we should adjust the radius too.
Recently in a rework of waypoints I came across many flags that were in the center of a tank, or vehicle, fountains and way on top of towers.
A normal capture waypoint:
You may have noticed a normal flag pole on a map, you walk up to it, place a waypoint near the poles center and it turns yellow and it automatically picks up the capture "area" number, then increases the waypoints volume by automatically adjusting the radius size.
When installing a waypoint the waypoint "flag" (capture) is automatically be applied and the important "area" number applied too.
The more difficult ones:
The ones inside vehicles and structures like fountains block you getting to them, so we must make a custom one or in some cases like vehicles... just use the "noclip" command in console, fly through and apply the waypoint.
Pathways from and to these waypoints in noclip are hard but possible. You have to work at it a bit but if you get the right height you can also add paths in noclip. Just keep trying about half way up the waypoint between the two waypoints.
The worse ones are ones that are on a tall column, the issue is without placing a waypoint near the flag you don't get the "Area" number.
The map dod_degunino_orange is a good one to look at...
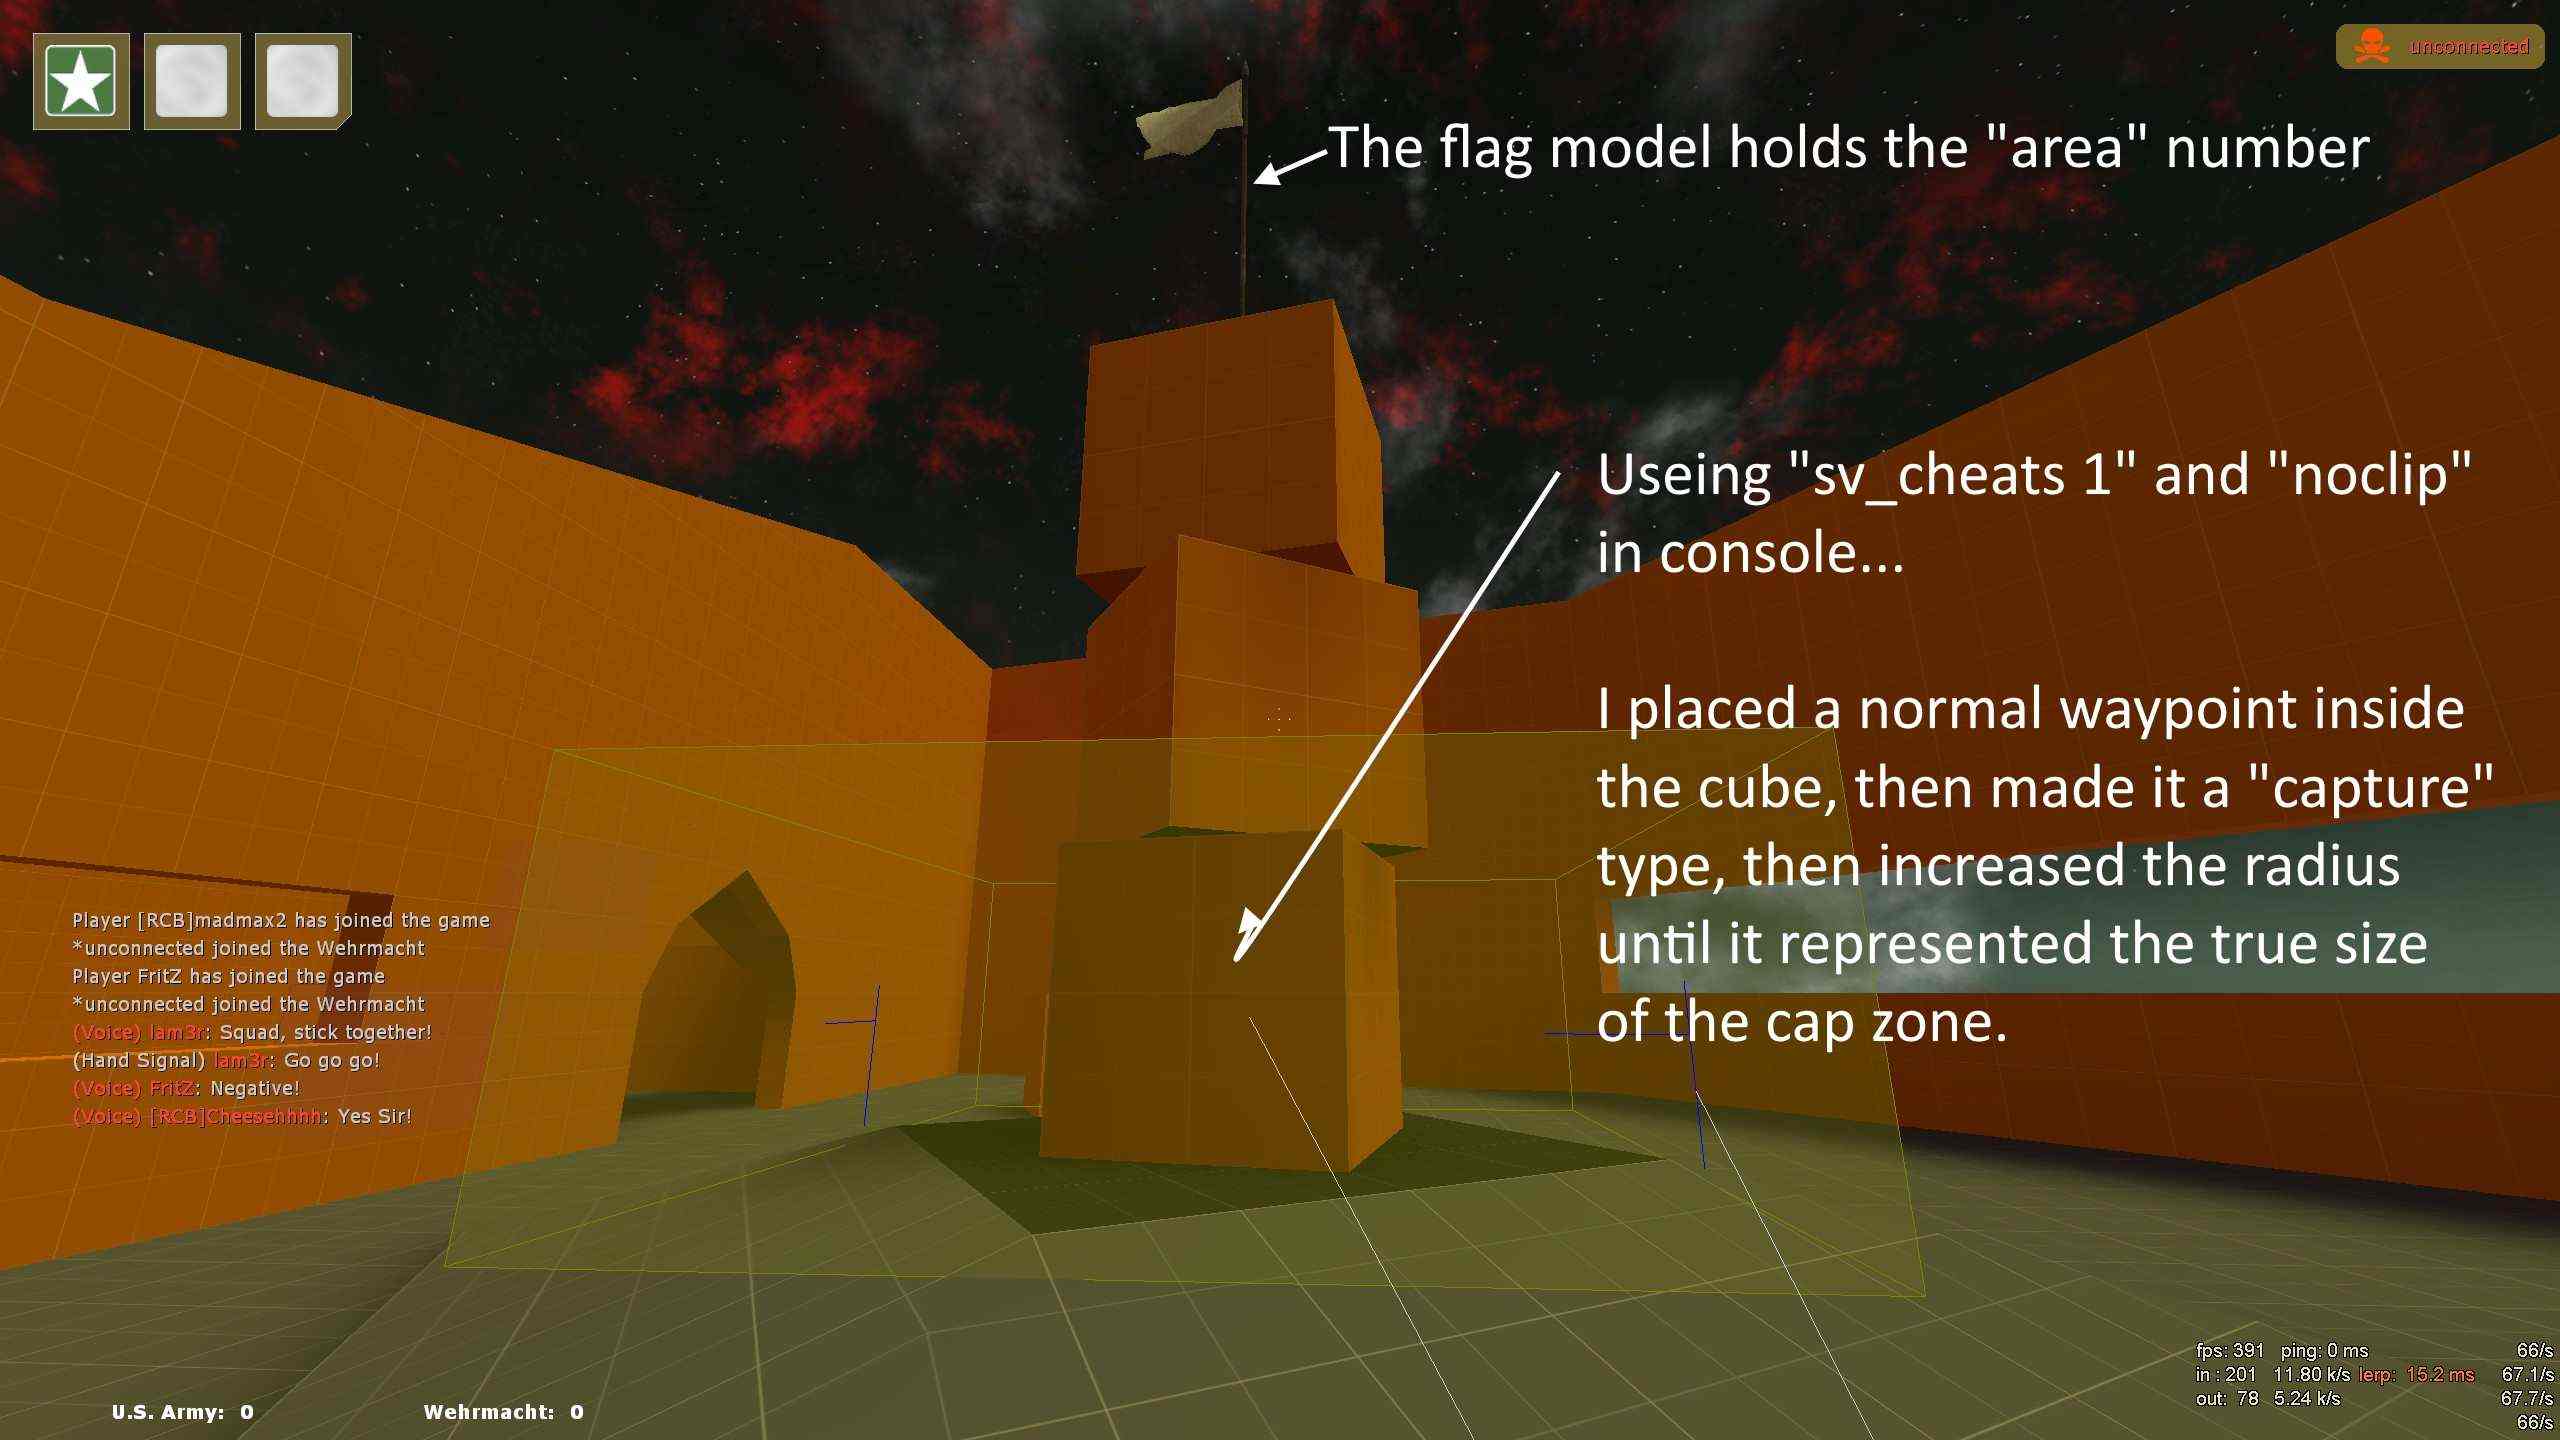 |
| Tall column used noclip to place one inside and adjusted it manually. |
That is a custom waypoint and now the bots know it is a capture zone, what area it is and where to stand.
There are many ways around these "tall columns" and the flag models inside structures like tanks and fountains.
You could make the bots crouch and slow them down but really there should be a proper waypoint made that has the capture flag and area applied...in the place the bots can get to and...connected to the other waypoints on the route.
RCBot2 waypoints on some maps that require TNT to capture or gain access to an area, can crash the map.
The map will work OK when Humans are playing, but add RCBot2 (the 2025 versions up to July 2025 at least) the RCBot2 code can crash on certain maps.
At the time of writing this, 30 July 2025, I have identified 3 maps that have issues, all three seem to have different reasons to trigger a crash.
Lets start with some basics.
Important: to understand the issue as a waypointer, you need to know some basic level design items.
Day of Defeat:Source has two basic "Gamemodes" for a mapper in level design.
Territorial Control (capture zones)
Object Detonation (planting bombs)
There are entities in the maps that RCBot2 look at to know how to navigate to these areas and if a capture waypoint has been set, what to do, either stand in a capture waypoint area (requiring "X" players and "X" seconds) or plant a bomb ("X bombs - can be up to 8).
The two different modes require the mapper to set information to a set of entities that must all work together to capture "control points" and report them to a central entity that controls a level "win".
Before we start I will mention a "brush" trigger. If you are not a mapper it is basically a (invisable in a completed map) cube volume in the Hammer editor (like a capture zone you stand in to cap a flag) that if a player enters that zone it will trigger a game event, like a capture, hurt, spawn wall, snow, rain all kinds of things.
The dod_control_point_master
Each "control point" on a map reports to a another entity called... dod_control_point_master.
That entity is quite simple, it collects the data from the different "control points" and has settings to determine a winner and can also be used to set a time limit of completing tasks for both or either Axis and Allies.
This dod_control_point_master entity isn't a issue in this case for RCBot2.
In this issue it's what a mapper sets when TNT (object detonation) is the gamemode or TNT is used on a map to blow up areas to access a area that requires capping, be that a capture zone (dod_capture_area a trigger "brush" in hammer) that you stand on... or a TNT dod_bomb_target where you plant a bomb.
The problem area here is related to the detonation gamemode only.
So we have a dod_control_point_master sitting at the top, next level in this hierarchy of three entities is a control point.
The dod_control_point it is what we see in the game as a flag. It is used in both a territorial and detonation game mode and has a LOT of settings.
One of the settings is this...
Number of Bombs required to destroy (point_num_bombs) <integer>The number of bombs required to destroy the point, if used as a bomb objective. Leave at zero if using a capture area instead.
That number in the game can be up to 8 and the game works fine.
However, the RCBot2 code it was discovered recently that it sets the maximum as, two.
That came up in a map called dod_inferno in that map are 6 bomb targets, the setting used in those is a number of three each.
So dod_inferno crashes because of the RCBot2 code, you cannot waypoint the map under the current version because of that. Someone may fix that in a upcoming RCBot2 release.
Does it end there? No. There are other issues.
Next is one of my maps, dod_bogan_snow_hill_b5. It crashes when waypointed for RCBot2 but not when Humans play it.
In this map I made it a seven flag capture types, all capture zones you stand in.
However, I had two doors (one for Axis and one for Allies) that you need to grab TNT and blow them up and access tunnels and ladders to 3 flags dod_control_point that are captured via standing on them, not bomb them.
I noticed the map would crash at certain points once I blew up the doors. The bots didn't attempt to blow the doors. I am not sure why yet but it could be related to using a dod_bomb_target that is not connected to a dod_control_point.
So, I made another version called dod_bogan_snow_hill_b6 removing the doors and the dod_bomb_target that blew them up.
The map ran better but... it crashed on the first test. Then I noticed I still had another entity that is required on a detonation map.
dod_bomb_dispenser is a further entity in the Object Detonation game play a mapper has to place in a TNT model, then make a 'brush' that is a invisible trigger. This gives you TNT when you walk in the zone, you hear a sound and the HUD icon changes from greyscale disabled to a colored enabled image.
I still had the dod_bomb_dispenser trigger brushes in my map even though they were not required anymore. I removed them and the map no longer crashes.
Off topic note: I also made a further version after fixing that in b6, there is a dod_bogan_snow_hill_b7 as well with reduced trees and fog.
I think in the case of my map RCBot2, once it sees any of the detonation maps entities, it expects the map to be a typical detonation enitiy set like dod_colmar and dod_jagd.
So lets look at what you see in game to visualize this hierarchy of three entities in capping and this one other one for supplying TNT.
You run a detonation map and...
That is the system explained as far as a mapper is conerned editing his map in Hammer and you in a map seeing the result.
The issues with that in the RCBot2 code is this works fine for standard maps like dod_colmar and dod_jagd, however step outside the various settings done in those maps and you run the chance of RCBot2 crashing the map.
So far we discussed two maps where this occours...
dod_inferno crashes because RCBot2 has a incorrectly set maximum bomb linit of 2 that should be up to 8. This map has 3 bombs to cap each capture points... it crashes.
dod_bogan_snow_hill_b5 crashed because I used a dod_bomb_target to open some doors but this was not connected to a dod_control_point and possibly RCBot2 does no cope with that. Not sure.
Remember that in that map I also had crashes just because I had left in the dod_bomb_dispenser entity in. So the RCBot2 code could also have a flaw there as well, the bots may expect this map to be a Object Detonation (planting bombs) gamemode when it is actually a Territorial Control (capture zones) gamemode.
I have a further map that I did find a lot of errors in the settings, however in fixing multipule errors in the settings of the four dod_control_point enities the map improved but... still crashed.
The map is dod_hillside_1944, a detionation gameplay version of dod_hillside_b7.
The whole map is run like dod_colmar, very similar.
However, on waypointing it I noticed two things.
As I said, I did find lots of issues in the various and many settings comparing the enities in dod_colmar, but the map still crashed.
There is some thing I have not found yet.
I then replaced ALL dod_control_point and dod_bomb_target enities from dod_colmar and put them in dod_hillside_1944 renaming the map dod_hillside_1944_rcbot.
It didn't crash anymore, perfomance was improved as well.
There is something else wrong in the settings of dod_hillside_1944 that I didn't find... not sure what it is.
Next maps found with a issue.
dod_donner_tank5
Same issue as I found on my snow map. The bots have a bomb target that blow up walls to get to a capture...but they ignore it.
dod_helms_attack_v2 and dod_v2 is also affected.
So whats the best advice at the moment (30 July 2025) ?
To anyone looking to waypoint a detonation type map and you see those issues...sorry, either the RCBot2 has to change or you need to make another map version.
Don't try and fix it in waypoints you are wasting your time.
You come across this issue every now and again in Day of Defeat:Source.
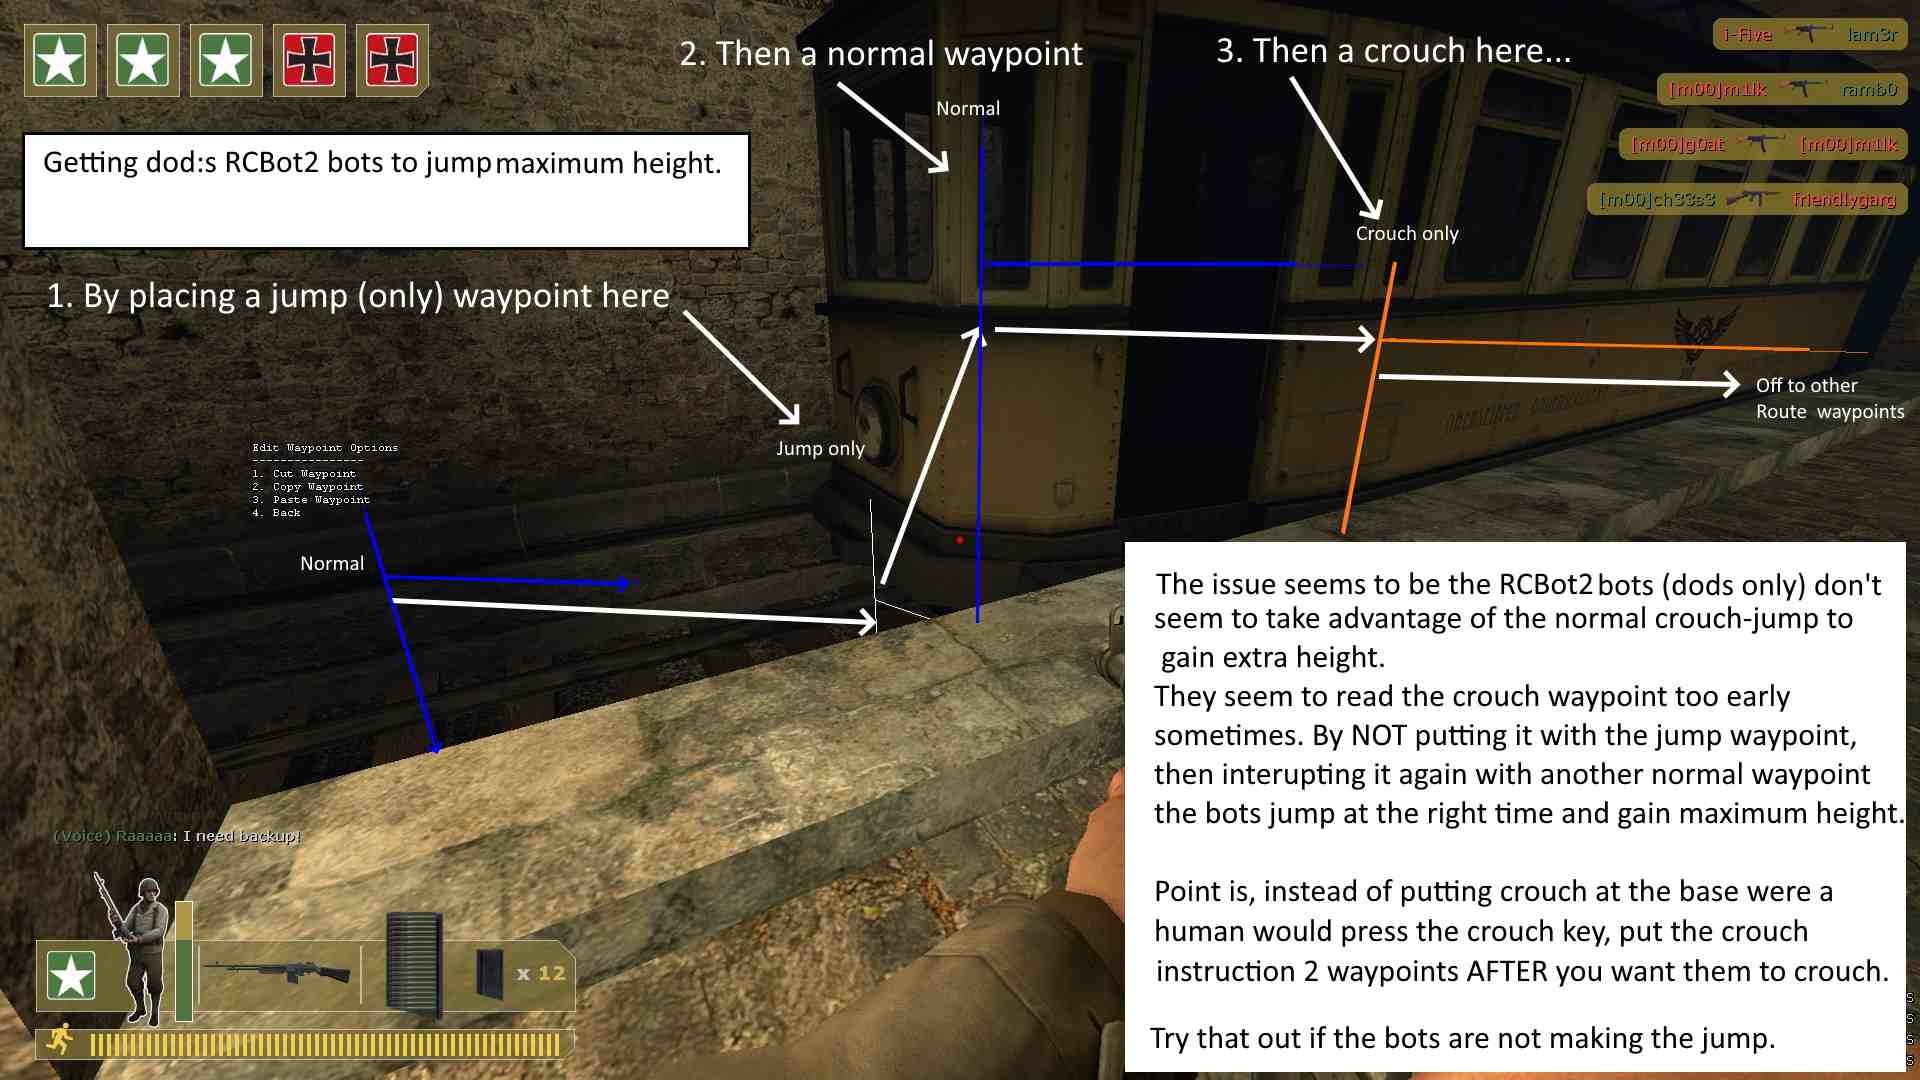
There is a technique used in a lot of games to get the maximum height, crouch-jump using your crouch and jump keys to get a jump to go higher than just the jump (spacebar normally).
Just the jump key is around 40 units (half life units in the map) but that can climb to 98 units when crouch is also used with jump properly.... hold crouch, jump then W or while using W (forward).
RCBot2 bots know how to do that but it seems they get the timing wrong, I have seen them do that jump without a waypoint instruction.
It seems when we place waypoint just before a very high jump, a human would natually place a crouch and a jump on the place where the bot should jump, lets say just before a tall crate.
The bots often like that waypoint arrangement...depending if it is a jump over 40 half life units. The bots seem to jump or crouch BEFORE they get to the waypoint, this disrupts how a crouch-jump-forward jump we make as humans.
So you can have some waypoints quite close together, a normal one, then a couple of steps away, a jump waypoint at the base of the jump, then a normal one at the top... then a crouch waypoint just after that.
Mixing up the waypoints like I have below, the bots now have no problems making the tall jump, the crouch waypoint seems to make a delay to stop them crouching too soon...
 |
| A special arrangment for a crouch jump solved this high jump on dod_old_oslo_b1 |
That worked there and there could be other sets of waypoints you can arrange when you see bots doing things like this.
Try that and more, sometimes moving a jump waypoint further away from the wall edge can allow the bot to reach maximum height before the top of the wall impact the feet of the bot model bounding box.
When I was looking at the bots on this set above, you could see them jumping too early and they do seem to crouch (breifly) midair.
For now, that is where I will stop in June 2025.
More to come soon. Contact me if you want an issue explained, I'll do my best to answer.