- Details
- Written by: INsane
- Category: DoD Ver 1.3 Custom - X-hairs, sprays etc.
- Hits: 16777


Edit March 2012 update. I have recently made a auto install package download this for dod steam 1.3 using SturmBot 1.7b and skip the manual install section, then go to this section and read from there to play and waypoint.
The old way...manually if you like...
The main reason this was made was to speed up the Waypointing part of SturmBOT, especially for the people who are learning. I thought of retiring this menu... but just in case I will leave it on-line for historical value... it's the only way we may be able to play with the old 1.3 version soon!
SturmBOT has many commands to type in the console. This can be quite daunting when you start, in fact it still annoys the hell out of me!
The Menu is complemented with binds and scripts as a total package for Playing and Waypointing SturmBOT. It is not easy to set up, but once it is... it does save time.
This is a second release and more than likely the last, DoD:S may put a dent in player numbers on-line... but no matter how good DoD:S is SturmBOT and ShrikeBot will make sure you can always play your old version forever...
This menu is dedicated to the memory of Johan Linde, aka Jowo.
The manual install menu package can be downloaded here.
To get the best out of this menu you should install another file as well as the... "commandmenu.txt" (this is the file for the menu)
The other one "SturmBOT_Menu.cfg" holds binds and aliases.
Install is easy... if you know your way around the dod folder.
1. Just place the file "commandmenu.txt" and the "SturmBOT_Menu.cfg" in your dod folder.
2. Open your "config.cfg" or "userconfig.cfg" file in the dod folder and add this line to the bottom... exec SturmBOT_Menu.cfg Press save.
3. Finished..... See the A QUICK LOOK INSIDE SturmBOT_Menu.cfg section at the bottom of this page.
You lost yet? Read on...
1. Below is the default address on most Steam installs. Some others may be...
C:\Program Files\Steam\SteamApps\your email name\day of defeat\dod
2. Don't get fooled here, the day of defeat folder may sound right but you want the "dod" folder. Put both files of the download in the dod folder...commandmenu.txt and SturmBOT_Menu.cfg
3. commandmenu.txt This is the menu file.
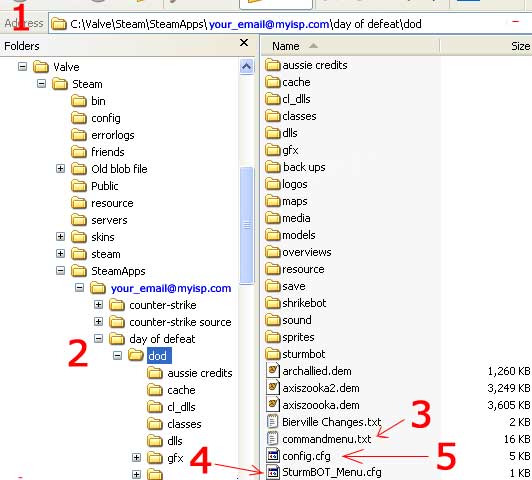
4. SturmBOT_Menu.cfg This is the custom file for your SturmBOT waypointing binds and menu.
5. config.cfg This is the file that holds your custom settings. Use NotePad to open .cfg files, you can tell Windows to always use NotePad to open these types of files.

6. When you open it,
go all the way down the bottom...
Then type in exec SturmBOT_Menu.cfg
7. Go to "File" Press save.
Put it all away.
I know it's a pain, but now you know how to find your config.cfg file.
To uninstall the menu, just delete those two files... the standard dod menu will come back when you do.
A QUICK LOOK INSIDE SturmBOT_Menu.cfg
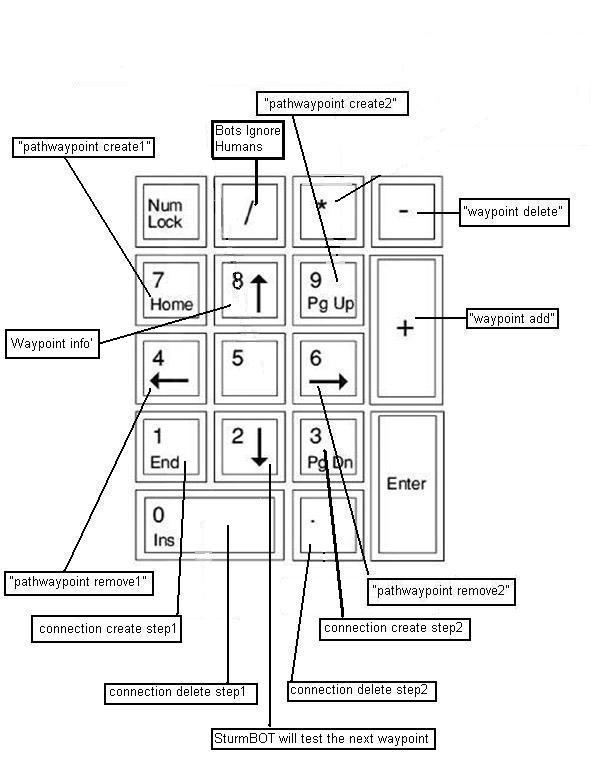
I have set some binds in the SturmBOT_Menu.cfg file. You might like to change them? Just open SturmBOT_Menu.cfg up like you did the config.cfg and change the bind keys to your liking. If you downloaded the installer package, Here is what they are set at...
Now you have installed the menu... there are two other sections you may like to read...
The Add Bot sections... Manualy add bots one by one. Fill or reset a server. Empty, Kick and Balance teams.
Manual adding. Automatic.
Bot Controls expands out into three sections Behavior, Weapons and Fun Modes.
The Behavior section. Weapons. Fun Modes.
Like the rest of the menu, the aim here was to automate a few commands into one click. When you use some of the Fun Modes in SturmBOT it gets a bit much and your game will crash if you have too many Bots. This depends on the power of your PC of course.
When you enter a Fun Mode with the aid of the menu the server numbers reset first, then the fun mode is added. A sort of a safety feature to stop your PC crashing.
The menu automates a lot of things needed to use SturmBOT by providing a single mouse click as opposed to entering in numerous typed commands in the console.
When you start to waypoint a map you have to start the engine, decide if you are going to lay down manual or auto waypoints with manual or automatic pathwaypoints. Then you may want to have those waypoints as a Team Specific or Non Team waypoints. This is before you have even placed the first waypoint!
Simple choices, but they can lead to many entries in to the console, take this scenario, you want to join Allies, lay down automatic waypoints only for the Allies, you do want to place paths and you need automatic ones...
Open console, type in press enter after each one...
1. pathwaypoint on.
2. autowaypoint on.
3. autopath on.
4. waypoint teamspecific
A lot of typing and you have not laid down a single waypoint yet.
Now try it this way...
Press the default key for you DoD menu "X', place your mouse pointer over the button "Waypoint Engine", slide over to "Start with Combinations", slide again to "AUTO Points AND Paths" click on it.
Go back to the same group and select "TEAM SPECIFIC (Toggle)"
That’s two keys and two clicks and no typing for the same result, plus you don't have to remember the commands...

Ok you get the idea, it's quicker.
You also don't have to remember a lot of commands or binds, it's in plain English right in front of you. There are lots of tasks when Waypointing that are long and drawn out.
There are some that are downright inconvenient.
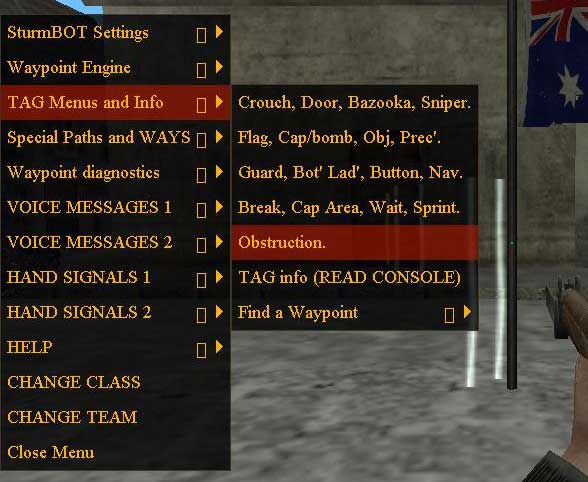
The Waypoint Tag system is handy but to get to the last tag types it's a lot of key pressing on the standard menu, this has been speed up a bit as well, if you want the Sprint Tag, just open the menu, select the "group" it is in, the standard menu comes up, press "4" for sprint... done. (See the Picture below)
When you get into the advanced side of Waypointing, the editing and final cleaning up/checking, you may come across a waypoint you have to remove, the waypoint is a special one with a tag... but what type of tag and what side does it belong to?
SturmBOT has a command called "waypoint info", very handy, stand over a waypoint, open the console, type in the command and it displays it in the console :)
It has some problems... if you have not set "waypoint team off" it will only tell you about your current teams waypoints/tags :(
The menu way is easier and it takes care of those problems... Select "TAG Menus and Info" then "TAG info (READ CONSOLE)" What happens after the click is the console opens for you, at the same time it activates the "waypoint team off" and the "waypoint info" command. It also adds a spacer to separate the different ones you looked at...
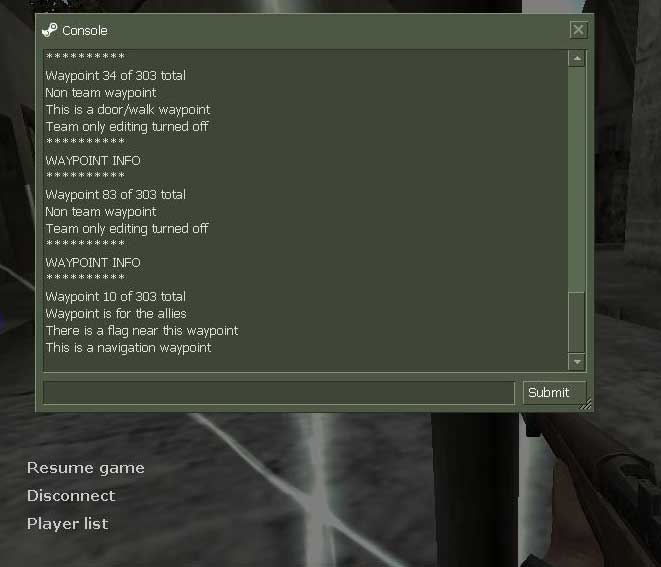
As you can see the different waypoints have been separated to make the results clearer and the process is quicker.
There are many more features like this in the menu, some I could not automate fully because of the half life console limits and the wording of the SturmBOT commands.
The "waypoint find" function was one of these, because it has the word "waypoint" and it is separated in two words, a complicated string of commands when also opening the console was not possible.
I tried to get the menu to find a waypoint with one click and type the number... it broke :( Still it was possible to simplify it a bit. In the "TAG Menus and Info" section you will see "Find a Waypoint", click on it and it will give you this...
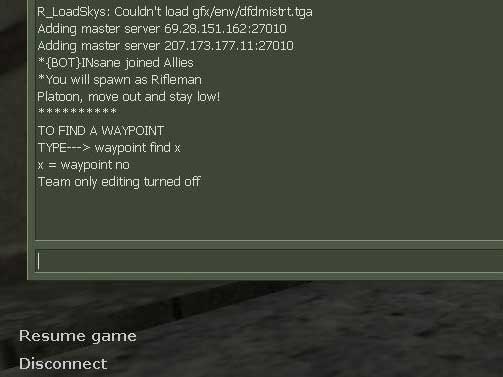
At least you have some sort of instruction to help. After you type in the command and number, remember... in the steam console you can press the keyboard up arrow to enter the last command typed and find other waypoints one after the other :)
Another one that could not be automated was the "waypoint creator" command to name your waypoints. This has the same kind of "Console Help"...
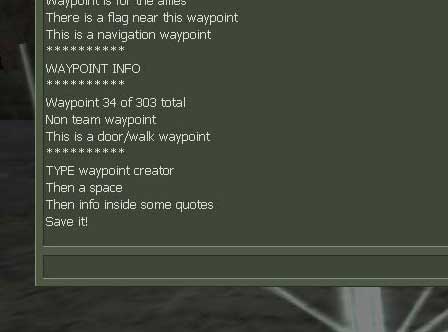
But enough of half features, here are the rest.
The two last sections are "Special Paths and WAYS" and "Waypoint diagnostics".
"Special Paths and WAYS" was included in the menu because it takes away the need to use up more bind keys for a couple of tasks that are not used that often... "waypoint connect" and "Ways". Again, it will save you a little time and trouble when waypointing a special place like a double cap area...
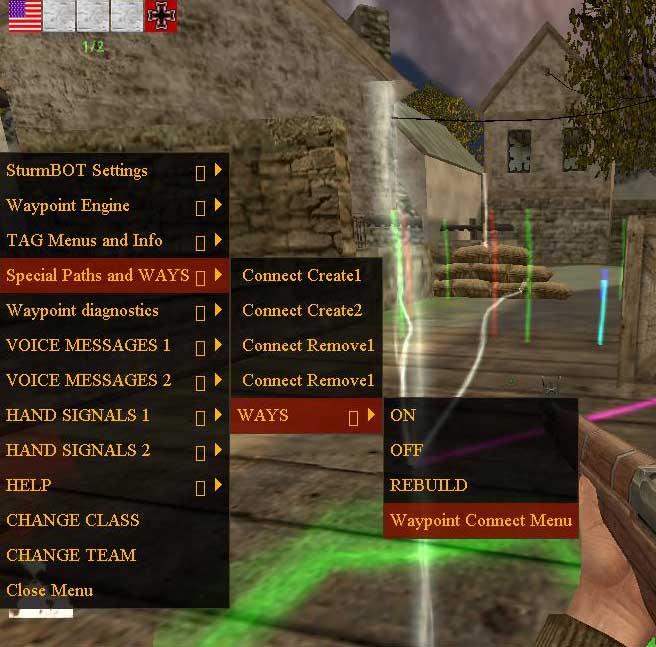
The "Waypoint diagnostics" section has Bots that test your Waypoints, one click will spawn a test Bot named "Pondexter". He will test the waypoint you are standing on and report errors. It does not matter if you are Allied and he is Axis the "observer on" command is also activated so he won't shoot you...
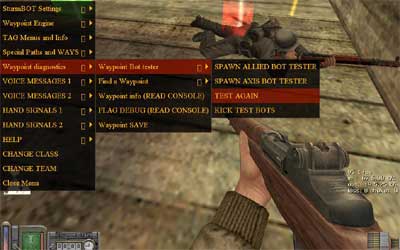
The other features in this section (some repeated) are...
"Find a Waypoint"
"Waypoint info (READ CONSOLE)"
"FLAG DEBUG (READ CONSOLE)"
"Waypoint SAVE"
For Waypointing alone that sums up the features in this menu.
That is the end of all the information on the menu, If you need anymore info on playing DoD 1.3 with SturmBot there are not a lot of articles left, let me know if you have any bot info, send it, I will post it here.
SturmBot guides are disappearing all the time, this one by Gooofy is the best, copied here in case something happens to it..
![]()
Learn DOD stuff - WaypointsLast updated: 2004/06/09 by · with assistance from the "waypoint team" Sturmbot is the bot for Day of Defeat, provided to us by Jowo (sadly, Jowo was just 16 years old when he was killed in the tsunomi which devastated Aceh, Indonesia in December 2005 while on holidays with his family). I have learned about as much as I can to get these bots up and running for most DOD maps. Waypoint Team · Jowo - for providing us with excellent Sturmbot players at home · Envinyatar - for the tutorial that comes with Strumbot · Zero - for shining the light on "navigation" waypoints · Godcha - for giving infinite number of examples to learn from · Sk2k - for helping me to exercise "team specific" waypoints · Hulk - for providing un-fathomable service to all with his houstondod web site · Rasputin - for providing fantastic waypoint feedback above and beyond the call of duty · Bigbadrat09 - for the special waypoint beta yahoo groups The Software:I am assuming that you have DOD installed and it is playable. Setup:Ensure that "-console" is in the command line for DOD desktop icon. Start DOD. Run a map:Click "multiplayer" Select your team and player. Waypointing a map:In general, the purpose of waypointing a map is to allow the bots to follow pre-laid out paths so that they appear to "know" where to go (where the flags are...etc), and what to do (place a bomb...etc). I have chosen to split waypoint learning into 3 sections, "beginner", "intermediate" and "advanced". Recently added "debug". In more detail, my 3 styles to waypointing are:
Once the waypoints have been saved, they will automatically be loaded next time you start DOD using this map. You can make changes and re-save the waypoints again, overwriting the previous ones, delete the waypoint file and start again...etc. To share your waypoints with friends, they are stored in the "C:\Sierra\Half-Life\dod\sturmbot\waypoints\" folder named after the map but the extension is "wpt" (example: dod_caen.wpt). Commands are entered by typing into the game console window. An example is: Drop down the console, using key ~ Type: pathwaypoint on Hide the console, using key ~ Now let's assign the function keys (top of keyboard) short-cuts to simplify repetitive commands. bind "F3" "sturmbot menu" bind "F4" "waypoint menu" bind "F6" "waypoint save" bind "F7" "waypoint add" bind "F8" "waypoint delete" bind "F9" "pathwaypoint create1" bind "F10" "pathwaypoint create2" bind "F11" "pathwaypoint remove1" bind "F12" "pathwaypoint remove2" NOTE: F5 is already taken for screen capture. Waypointing - Beginner styleI believe that this section will cover the essentials to waypointing - the stuff you cannot do without. I am assuming that, at this point, you are now a player (Allies or Axis) in the map you want to waypoint. In order to see what you are doing, you need to expose waypoints, as normally they are hidden. You won't notice anything different now, as you don't have any waypoints yet. If you see colourful vertical lines, and white horizontal lines, then waypoints already exist. This is useful to learn how other people have done waypointing. To make things a bit easier (I am biting my tongue here!), enable autowaypointing, by typing in the console: autowaypoint on You should have heard a clunk sound (like a tooth just got pulled out), and if you take a step backwards, you should see a blue vertical line the same height as a player. (Why do I bite my tongue? Well, read the whole document first, to find out.) Ideally, you want all spawn points to have a waypoint; however, we have flexibility to put waypoints in the general vicinity and the bots will find it, usually. Now walk a few steps forward (ie. away from the spawn area, towards the first flag). What you should see are 2 blue vertical lines (waypoints), with 1 white horizontal line connecting them (path). Actually, the path looks like several, but it is only dancing around to be visible - lol. Can you feel the power? Are you psyched? CONGRATULATIONS: You are now an official waypointer! Ok, now keep walking towards the first flag (I hope your chosen map has flags!). NOTE: If you observe that a waypoint got created in a spot that a white connecting line (path) was not established, then return to an in-between spot and manually place a waypoint by pressing function key F7 (assuming you bind the keys as described above). This new waypoint should now have paths going to the other waypoints on either side. If not, then manually add some more. Get the idea? RULE: All waypoints need paths, if you want a bot to get to it. So here you are with waypoints automatically added, and some that were manually added. You should have heard a different sound (like a bird stuck in a fan). 4. Save your work, by pressing the F6 function key. Ok, you finally came up to a flag. That is great; however, the bots need to know that this waypoint is special. Waypoint Tags 1. Crouch Jump 2. Door Waypoint 3. Bazooka Target 4. Sniper Spot 5. More... We want the "flag" tag, so press 5 to scroll to the next list of tags. Waypoint Tags 6. Flag Location 7. Capture/Bomb Location 8. Object Location 9. Precision Waypoint 10. More... Alright, press the number that is for the "flag" tag, the 1 key. Save your work, by pressing the F6 function key. Step over the flag waypoint and type in the console: waypoint info You should see in the console something like this: Waypoint 14 of 15 total Non team waypoint There is a flag near this waypoint Ok, you feel good of what you have done so far, and you want to carve your name into this waypoint file. waypoint creator "Sturmbot waypoints created by me, 2003" Save your work, by pressing the F6 function key. Most flags need only 1 player to walk over to control it. To setup a capture area flag is not simple. I suggest these steps: a. Create a waypoint where you want the player(s) to wait for the flag to be captured.. Ensure that it has paths to other waypoints. b. Stand over this new waypoint and bring up the waypoint menu, press F4. The waypoint has turned a white colour. Look down and you will see a blue pulsating ring on the ground. c. Now step to the flag (or if no flag, then anywhere near the "capture area" waypoint), and create a "flag" waypoint (see Step 5 above) d. Now what is needed is a special connection between the "capture area" and "flag" waypoints. This will allow the bots to understand how that flag operates. To do this, step over the "capture area" waypoint and start the creation of a connection, by typing in the console: connection create1 e. Complete this connection by stepping over the "flag" waypoint, and typing in the console: connection create2 To see what you just did, walk back to the "capture area" waypoint, and look towards the "flag" waypoint. You should see another path of the colour purple (or pink?). This is the connection. f. This is terrific, unfortunately, you need to create a similar connection in the other direction, that is, from the "flag" waypoint to the "capture area" waypoint. connection create1 g. Complete the connection by stepping over the "capture area" waypoint, and in the console type (you got it): connection create2 Picture time... So you see, paths/connections actually have 2 directions, and "autowaypoint on" creates paths automatically. In the intermediate style I will discuss this further (please remind me). There is no wait period assignment, as the bots seem to acknowledge when the flag connected to the "capture area" waypoint has been controlled. They will even call out "I need backup!" to get other bot's attention. Amazing! Um, just for documentation sake, you can also remove connections in a similar fashion as creating them but substitute "create" with "remove", for example: connection remove1 connection remove2 Save your work, by pressing the F6 function key. For maps with objects (like TNT or satchel charges) you will need 2 new waypoint tags, the location of the object, and the destination for the object. There is no care to which actual satchel charge is used for a particular breakable wall. To create an "object" waypoint, stand over the object, and create a waypoint. Don't forget, save your work, by pressing the F6 function key. For maps with objects (like TNT or satchel charges) you will need 2 new waypoint tags, the location of the object, and the destination for the object. To create a "capture/bomb" waypoint, stand over the target, and create a waypoint. Save your work, by pressing the F6 function key. Special section for objects that need to be captured, example: documents (like in dod_jagd). You will require the use of 3 waypoints (object, capture, and flag) as well as connections. 0. Place an "object" waypoint at the object (ie. document). 1. Place a "flag" waypoint near the object (ie. document). 2. Place a "capture" waypoint at the return location of the object (ie. spawn). 3. Make connections in both directions between the "object" and "capture" waypoints. 4. Make a connection in both directions between the "flag" and "capture" waypoints.
Ok, you've come a long way, and this is only the beginner style (haha)! There are places where the bot needs to crouch, like in a tunnel. I don't have a comment on "prone" waypoints, but go prone and create a waypoint, and you will notice that that works fine. Save your work, by pressing the F6 function key. This is the last waypoint covered for the beginner style, and it is a tricky one. These instructions will blend in nicely for the intermediate style following. Ok, there is a wall that the bot needs to hop over. Yes, this can be done too. NOTE: I prefer to create a "crouch" waypoint first, then assign the "jump" tag to it; however, this colour remains a light blue. Have I told you to save your work yet? Press the F6 function key. Almost there! Save your work, by pressing the F6 function key. Cool? Well, not so fast. I have observed that the paths are not always automatically created between the bottom "ladder" waypoint and the top one. Climb down to the bottom "ladder" waypoint. Look up, do you see a white path to the top "ladder" waypoint? This is similar to creating connections (see Step 8). pathwaypoint create1 pathwaypoint create2 Um, just for documentation sake (again), you can also remove paths in a similar fashion as creating them but substitute "create" with "remove", for example: pathwaypoint remove1 pathwaypoint remove2 Save your work, by pressing the F6 function key. 15. Test your work: Go ahead, test out your masterpiece! B-U-T FIRST! Disable the automatic creation of waypoints! Otherwise you are dead meat as the bots will cause the automatic creation of waypoints, in the air sometimes. autowaypoint off Press F3 and add a bot for the team that you have created spawn waypoints for. Follow the bot around for a while, and observe how it handles your waypoints. NOTE: I have been warned that having bots in the map while you are creating/editing waypoints is bad. I have never experienced any problems, but those whom have, swear very loudly. Waypointing - Intermediate styleI think the first step at becomming an intermediate waypointer is to have more control of the waypoint and path creation process. In the "ladder" waypoints (Step 13), you possibly needed to create a path manually from the bottom "ladder" waypoint to the top one. Also, for the "capture area" waypoint (Step 8) you needed to manually create connections. So you are already have experience with creating paths/connections manually, and probably by now created waypoints manually too. You just need some more information. That is, how to disable the automatic waypoint/path creation? While testing your waypoints with bots (Step 15), I asked you to disable automatic creation of waypoints (ie. autowaypoint off). Let's turn off automatic path creation, by typing in the console: autopath Create a new waypoint, now you see just the waypoint, just like when you created your first one (Step 2). You are now an intermediate waypointer with full control of what gets built. The sad part is that we are humans, and make mistakes. We need to repair such mistakes. waypoint find 12 To turn this locator off, in the console type: waypoint find off Now here is something you don't want to miss. You want to see if a bot can make those tricky jumps waypoints? waypoint test If 2 hours (just kidding) go by and he hasn't shown up yet, issue the command again. bind "t" "waypoint test" Going through doors are not the best choice for bots, as the doors need to be pushed open, and then there is a delay for the door to swing wide enough, and then they close. The "door" waypoint prevents the bots from looking sideways, and also makes them pause for a short while. Do I need to tell you how to tag the "door" waypoint? Good, well, atleast I'll tell you where to locate the door waypoint... NOTE: Prevent a path passing through the door when the door is open, know what I mean? Instead, make waypoints going around the open door. Tag a waypoint as "guard" and a bot will stay there for a long time. You can create "guard" waypoints, in combination with standing, crouching or proning (sp?) positions. Similar to "guard" waypoints", snipers need to have their special spots (alleys, windows...etc). So far all your waypoints have been "non team specific". That means that that waypoint is recognized by all teams. Some places (like an alley), you want one team to move left, and the other team to move right. Or, you don't want the Allies bots to travel into the Axis spawn area, nor vice versa! waypoint teamspecific NOTE: I believe that a well waypointed map, combines a good blend of "team specific" and "non team specific" waypoints where it matters. With these waypoints, you have more control as to how each team approaches flags, around corners, or bridges...etc. For editing these "team specific" waypoints, a handy command is: waypoint team off WARNING: Take extra care when using "capture area" tags with "team specific" waypoints. I suggest to match the "flag" and "capture area" waypoints as "team specific", for both teams respectively. Picture time... You are now classified as an intermediate waypointer - IMHO. Waypointing - Advanced styleSo, you have fallen in love with waypointing and can't wait to become an above average waypointer, right? Here are my tricks of the trade... The "bottom ladder" waypoint tells the bot, that it is safe to jump off the ladder from here (assuming he is climbing down), as opposed to climbing all the way down to the bottom, then unsticking itself. To smartly do this, create a new waypoint on the ladder above the lower "ladder" waypoint and assign the tag to "bottom ladder". Create a path from this waypoint to the waypoint on the ground that you would like the bot to jump to. Picture time... Oh, while I am in this picture, can you notice, there is a "crouch" waypoint from the top "ladder" waypoint? This one is sometimes impossibe to live without! WARNING: I have experience problems with "precision" waypoints, because as several bots are running in a line and the first bot misses the waypoint, then doubles back, he causes a block, and a jam results. Not sure where this will be handy? Ok, I'll give some examples:
Need to get your bot sprinting through and air-strike zone? This is required to get the bot to activate object, like a mortar (dod_ambushcombat), or TNT coil (dod_train), for example. (Notice I am just flying through these, well, that's because I am saving my energy for "navigation" waypoints.) Ok, the map requires you to jump through a window (dod_wildwest) or sewer grate (dod_flash)! Actually, the bots seem to randomly shoot at breakable objects anyhow, but this tag forces them to do it. This is used to get the bots to "line up" behind each other, so that they can buy movie tickets in an orderly fashion. Again? This was covered in the intermediate style section. Ok, you can get the bots to jump, but did you know that you can with good results?
Well, this is it. We have reached the "mother" of all waypoints. The standard waypoints are good enough, but the bots will find the shortest path and take it, always. Is that any fun, just set your MG outside the door, and clean up the lot of them? Ok, get on with it man! Introducing "navigation" waypoints. These give you (the waypointer) the ultimate in control, by allowing the bots to resemble, as closely as possible, human player path selections. Besides waypoints, we have covered "paths" (connecting waypoints to each other) and "connections" (connecting the "flag" to "capture area" waypoints). We now have "ways" connecting "navigation" waypoints, travelling through "paths". My method of assigning a "navigation" tag is to create a "team specific" waypoint first, then assign it the tag. Picture time (I'm gonna need lots)...
I realize that my pictures suck, so I have provided a custom map with "navigation" waypoints just to teach this topic. You can download the 45kB ZIP file from here. Join as spectator, then add 2 bots on each side (recommend the 2nd rifle man - carbine/karabiner), sit back, watch and understand. While in my custom map, join a team and try these console commands to see before your very own eyes, what the "ways" look like: ways on ways off When adding/editing "navigation" waypoints, you may need to have to rebuild the "ways". Do that with console command: ways rebuild Now here is something you don't want to miss. Most objectives should be linked with a flag entity in the map. waypoint connect Join a team (ie. do not play in spectator mode), and type in the console window: flagdebug
Good luck! THE END
|
Designed by INsane Webmaster - dodbits.com using Template Toaster (Joomla! Version 4)
